This is a comprehensive guide on how to synchronize the OpenLM Database with an organization’s directory service using Directory Sync. To see how to set up Directory Sync on Cloud, follow this guide.
To see the Mappings between Ldap attributes and OpenLM User attributes, click on this link.
Overview
OpenLM provides functionality for synchronizing the OpenLM database with user information from a domain directory (e.g. ActiveDirectory). This is accomplished using the Directory Sync product, which consists of two components:
- Directory Synchronization Agent (DSA), further in the document DSA.
- Directory Synchronization Service (DSS), further in the document DSS.
Both components are required to be installed for LDAP synchronization.
Architecture overview:
- DSS connects to OpenLM SLM directly. It can be installed on the same machine as OpenLM SLM or a separate one. The function of the DSS is to store the sync definitions and manage the Agents.
- One or more DSAs connect to the DSS. DSA can be installed on the same machine as DSS or a separate one. Its function is to take the sync definitions from DSS, query the domain directory, and report the data back to DSS.
- Once DSS has received this data from DSA, it is ready to send it back to OpenLM SLM.
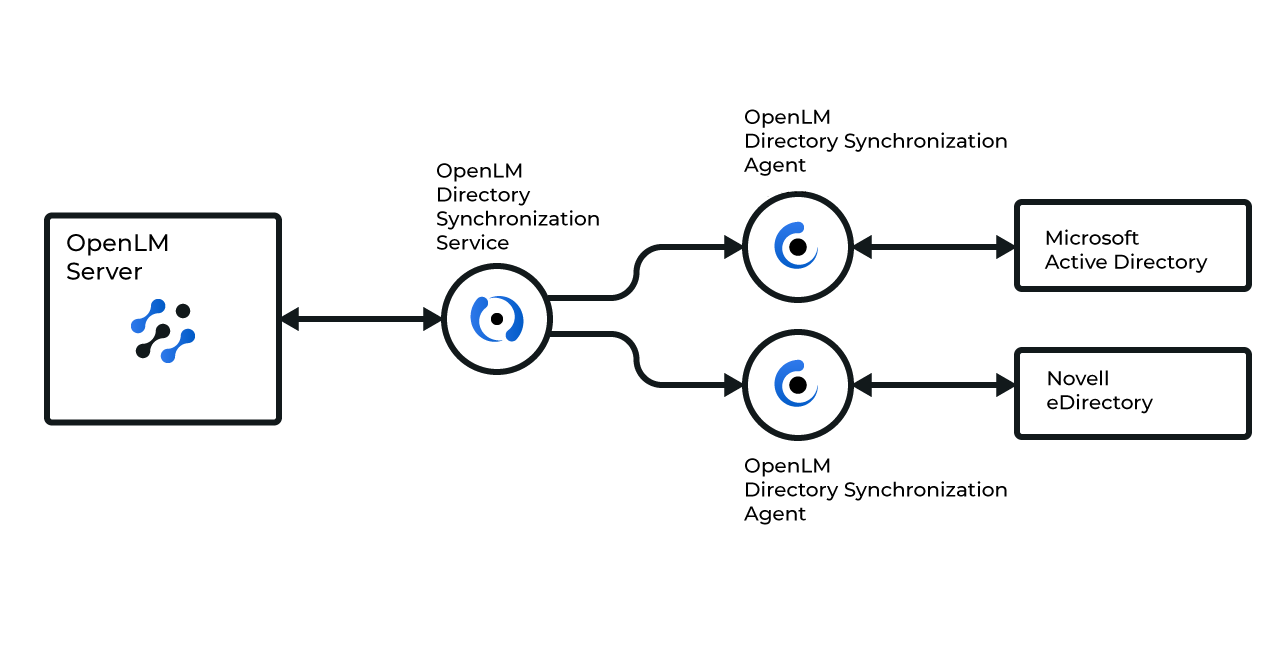
Note: A single DSA can be used to query multiple directories (i.e. both AD and eDirectory). This diagram illustrates only one of many possible configurations where two separate DSAs can be used.
Requirements
- OpenLM SLM 21 or higher.
- A license file that has support for the Directory Sync extension (contact sales@openlm.com if unsure).
- If installing DSS and DSA on a machine separate from OpenLM SLM, make sure that the machine is on the same network as the AD domain controller.
- A designated schema in any supported database – MariaDB, MS SQL, My SQL (Firebird has been deprecated).
Port configuration:
Port 8081 must be free when installing DSA. If it is occupied and you get an error during the installation stage, edit the kestrel.config file in the DSA installation folder (C: Program FilesOpenLMOpenLM Directory Synchronization Agent), change the port number and restart the DSA service.
Additionally, if installing DSS and DSA on separate machines from OpenLM SLM, you will have to make sure that proper firewall rules are set for the application ports:
- OpenLM SLM machine: inbound for 5015, outbound for 7026
- DSS machine: both inbound and outbound for 7026
- DSA machine: outbound for 7026
Configuration
Directory Synchronization Service (DSS)
Before DSS is operational, you have to finish its configuration. To do so:
1. Open the Directory Sync user interface. This will either happen automatically when you click Finish on the DSS installer or by going to Windows Start → OpenLM → OpenLM Directory Sync.
Note: If you use Identity Service, configure the DSS in the Identity Service and restart the DSS service. Use this guide for more. If you do not use Identity Service – then no login is required.
2. On the left menu, click on the Service Configuration tab.
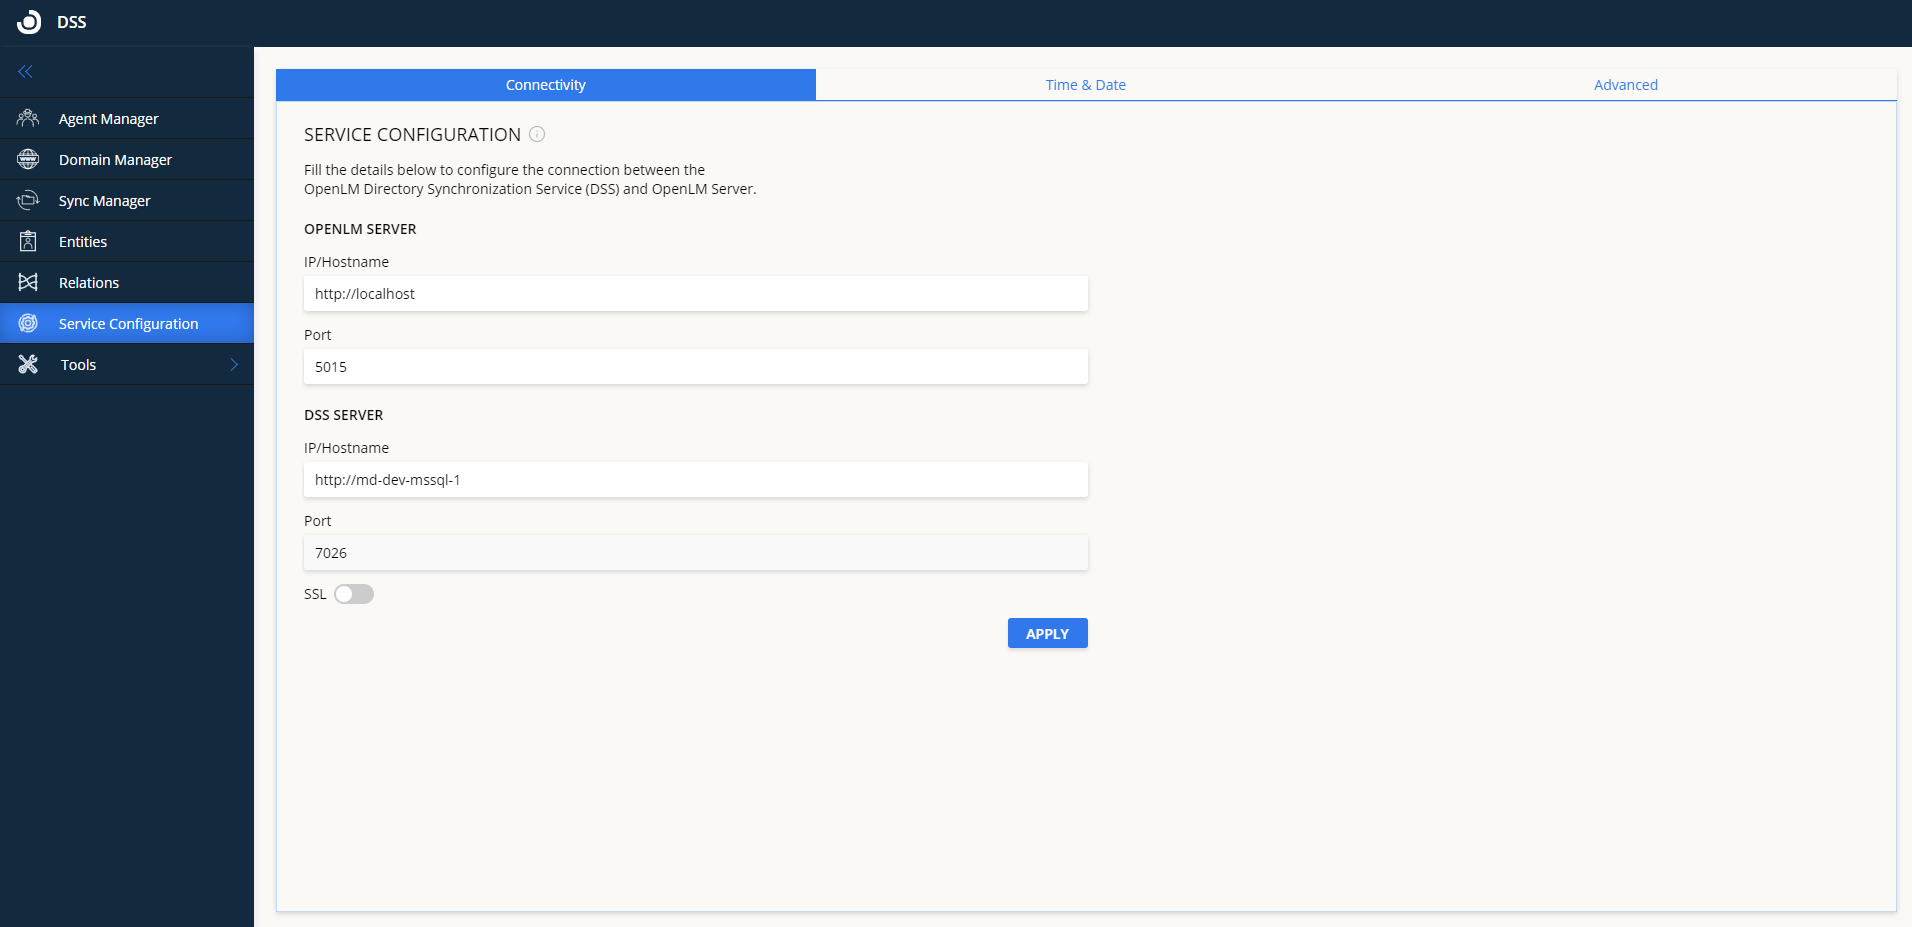
3. Fill in the details as follows:
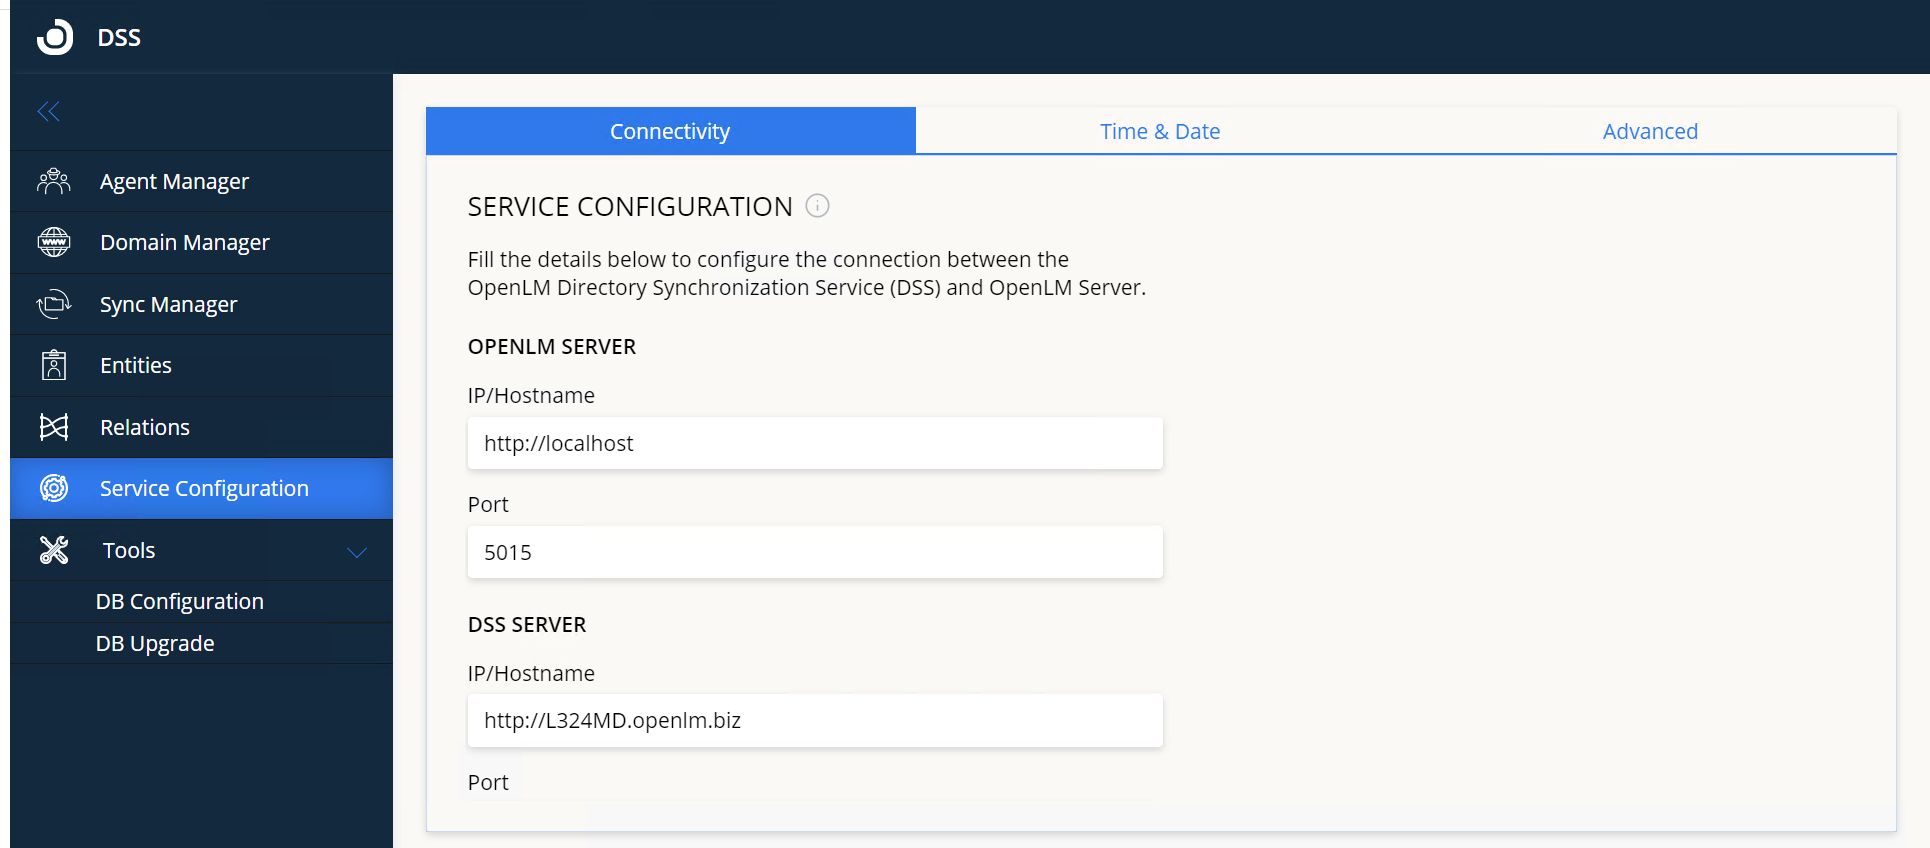
Illustration: default settings for OpenLM SLM and DSS installed on the same machine
OpenLM SLM:
- IP/Hostname – the URL of the OpenLM SLM machine that DSS will connect and report to. If HTTPS/SSL is turned on for OpenLM SLM, make sure that the hostname here is exactly as it appears on the SSL certificate.
- Port – the API port of the OpenLM SLM (default: 5015)
DSS Server
- IP/Hostname – the URL of the DSS server that will be reported to the OpenLM SLM machine. If you have installed DSS on a machine different from OpenLM SLM, specify its address. If using SSL, make sure the hostname is exactly as it’s reflected on the certificate file.
- Port – the port through which the DSS UI is served (default: 7026). By default, this field is read-only. To change, edit kestrel.config in C:Program FilesOpenLMOpenLM Directory Synchronization Service Service and restart the DSS Service.
- SSL – toggle to either enable or disable HTTPS for the DSS communications port. If turned on, you will also have to specify the SSL certificate file (pfx) and the Password for the SSL certificate. DSA connection settings will also have to be adjusted by editing the OpenLM.Ldap.Agent.config file in the DSA installation folder. See this document for the workflow of DSS with Server and Identity configured with SSL (HTTPS)
Additional Service Configurations:
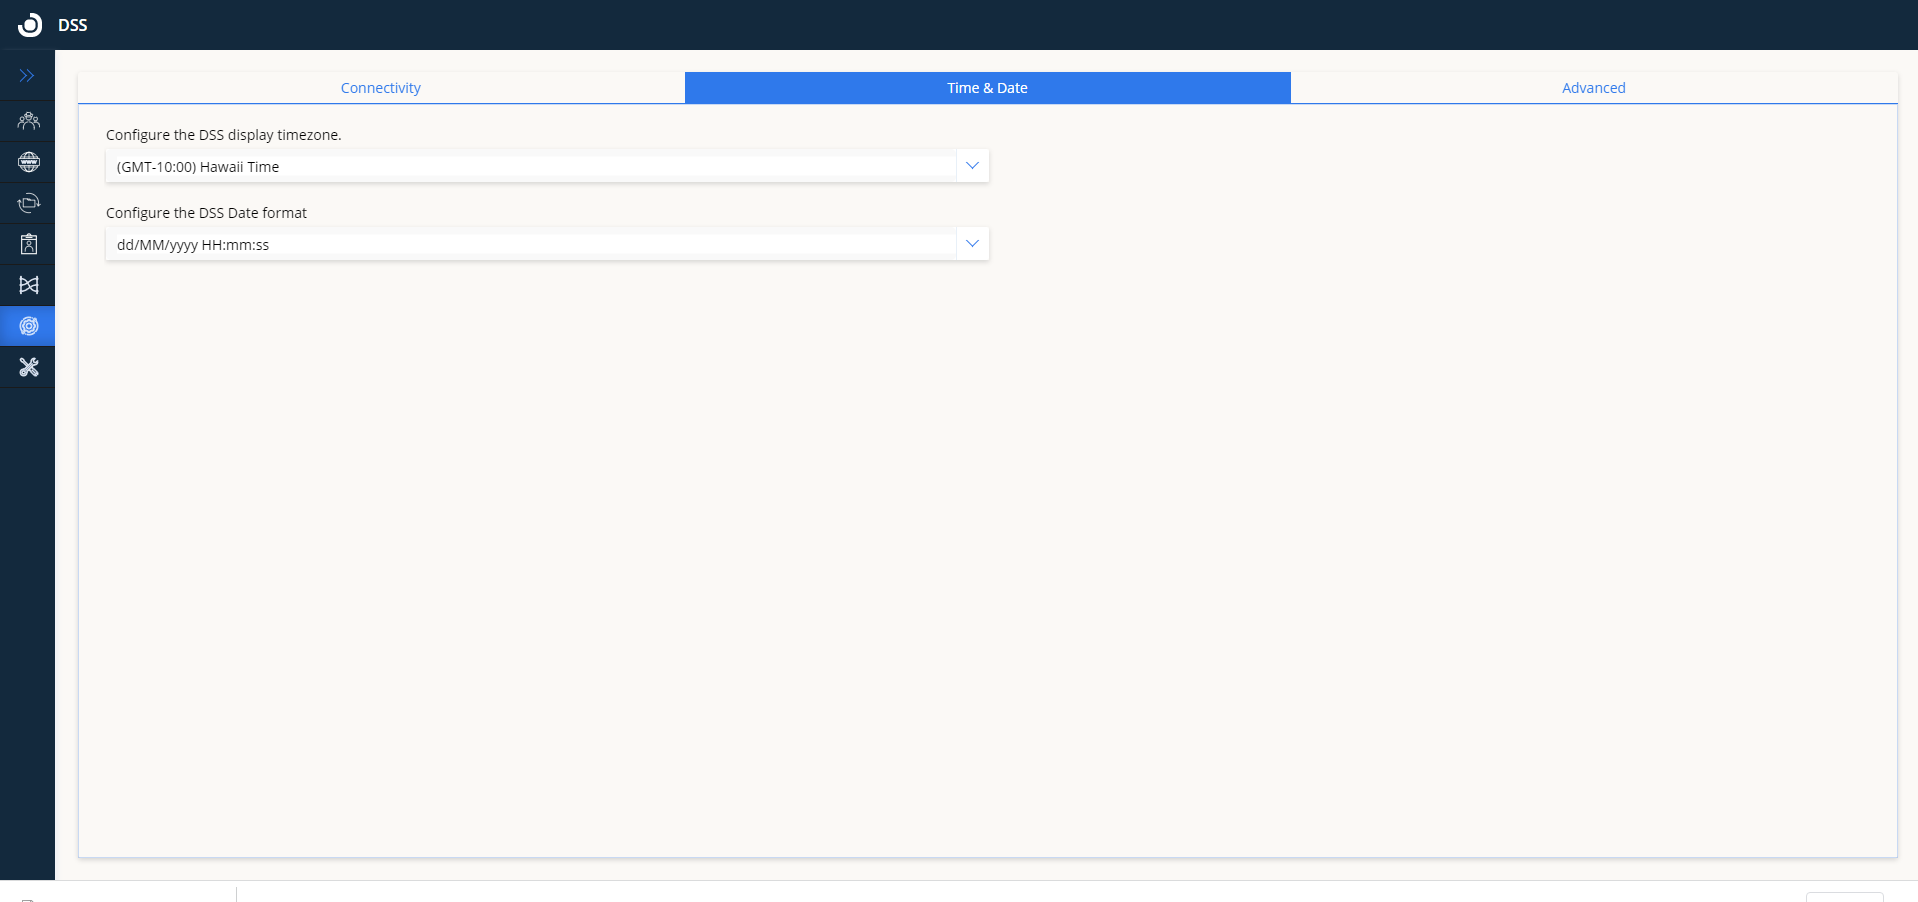
Time&Date
- It allows specifying the timezone displayed and used in DSS UI:
Advanced:
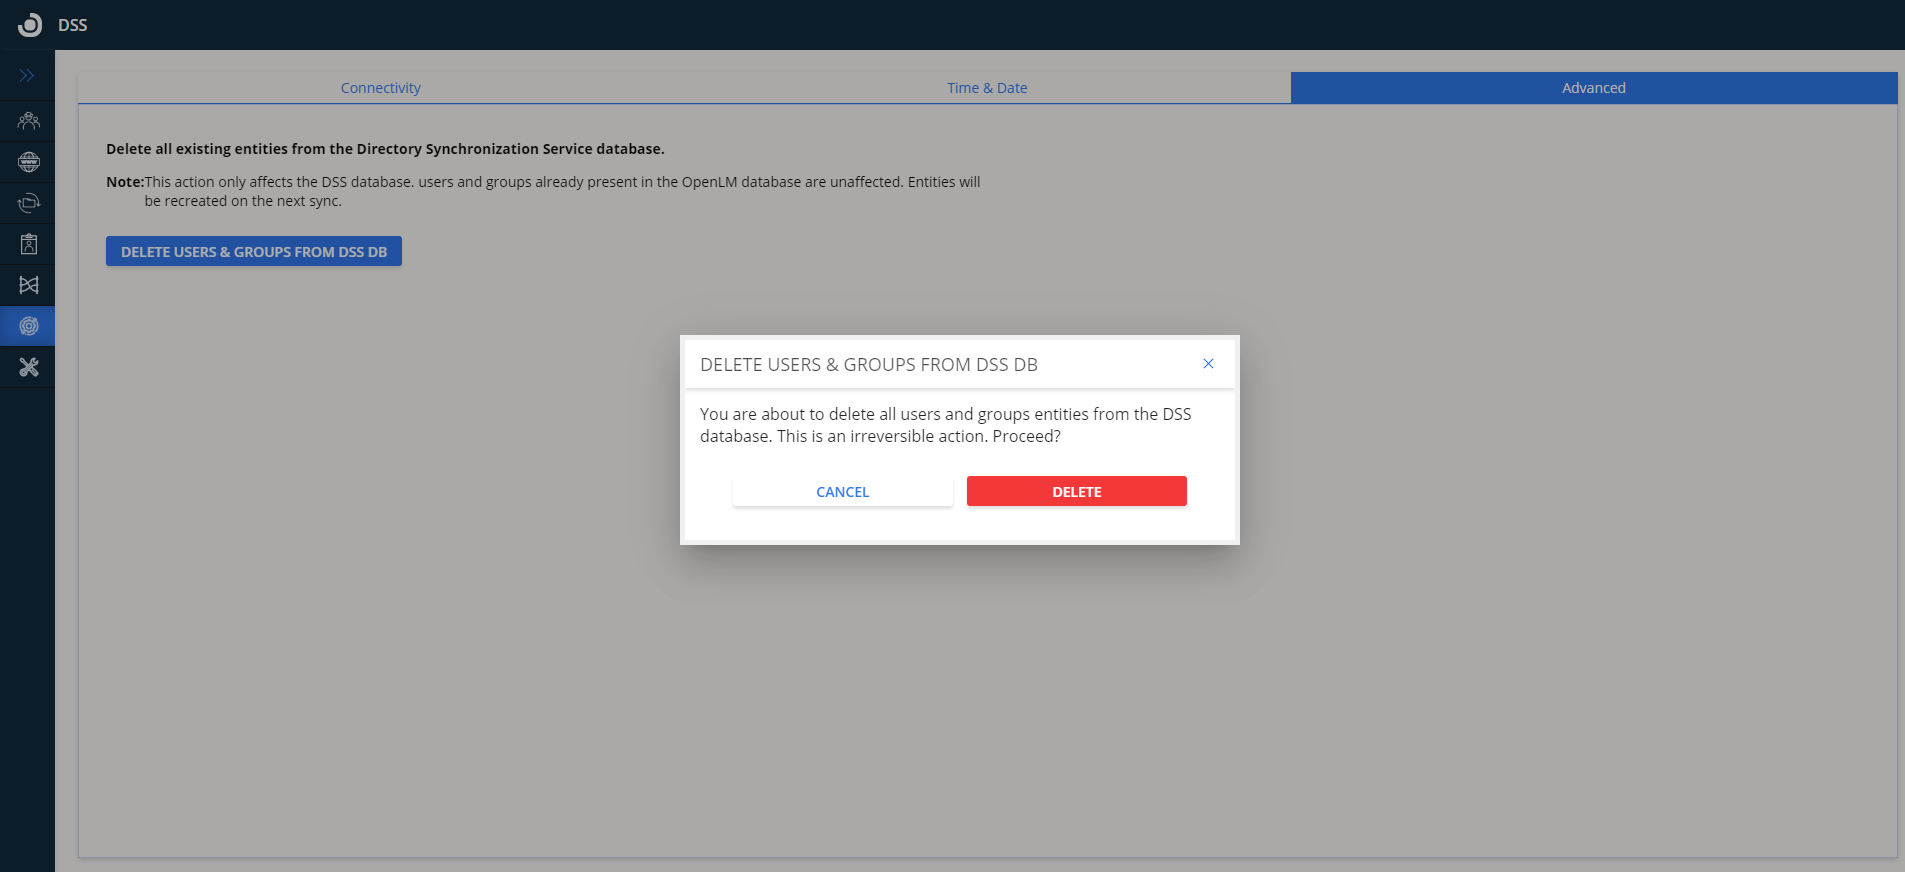
- The Advanced tab allows deleting users and Groups from the DSS database. It should be used to delete entities and relations from the DSS Database and should not be used in the process of the initial configuration of DSS. Be mindful as this is an irreversible action:
4. Click Apply to finalize the configuration. This will send a connection request to OpenLM SLM.
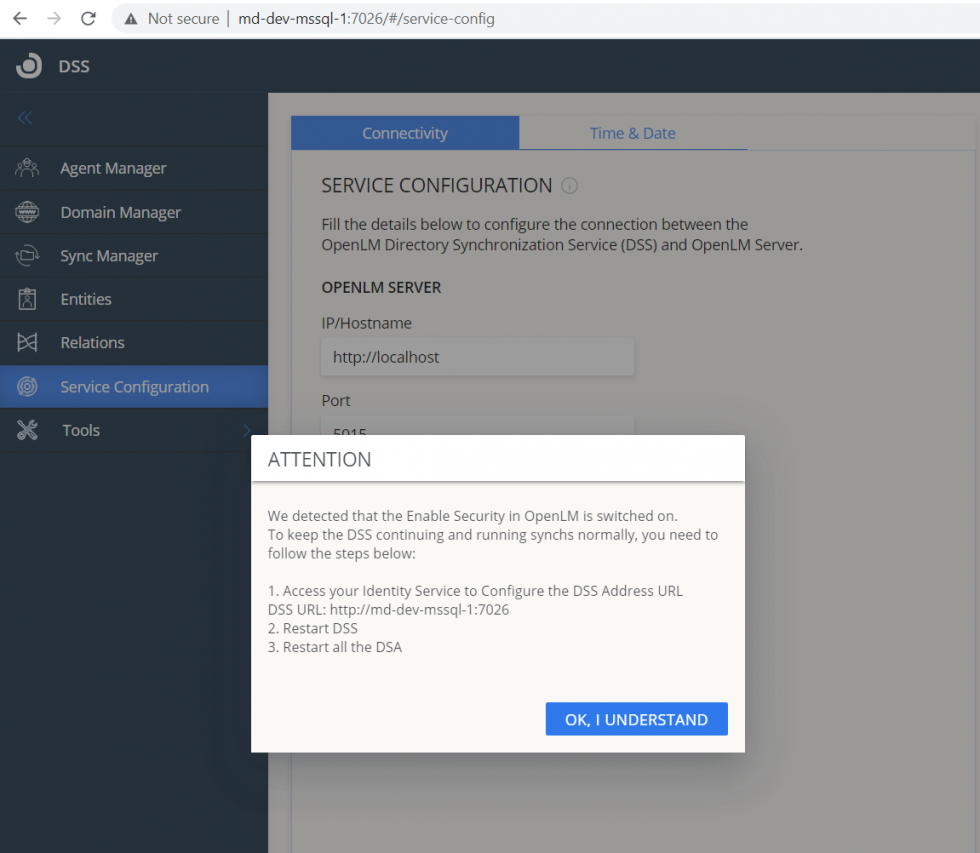
Note: If you are using Identity Service, the DSS will automatically detect this configuration:
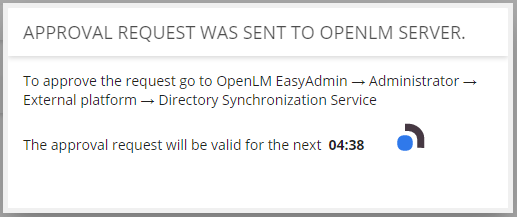
5. Open EasyAdmin (Windows Start → OpenLM → OpenLM EasyAdmin User Interface).
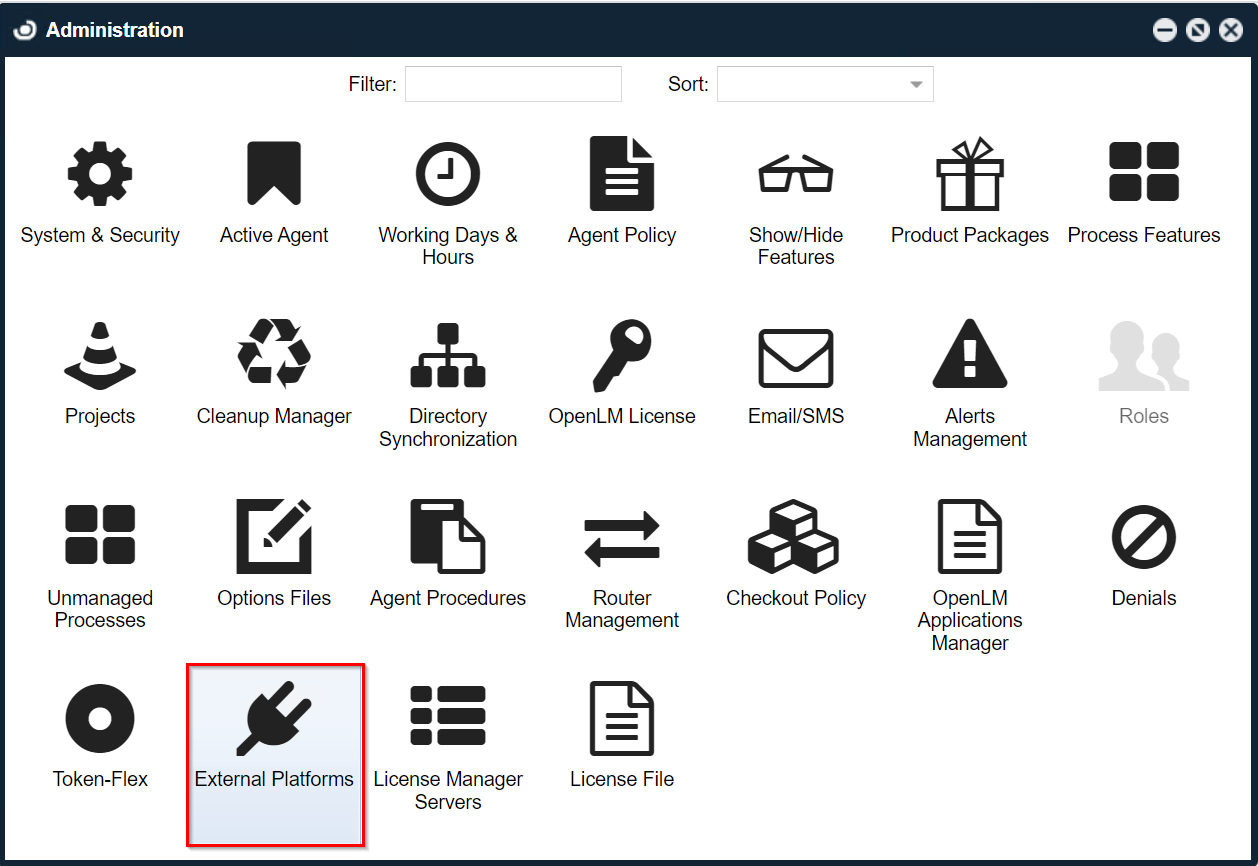
6. Go to EasyAdmin Start → Administration then click on External Platforms.
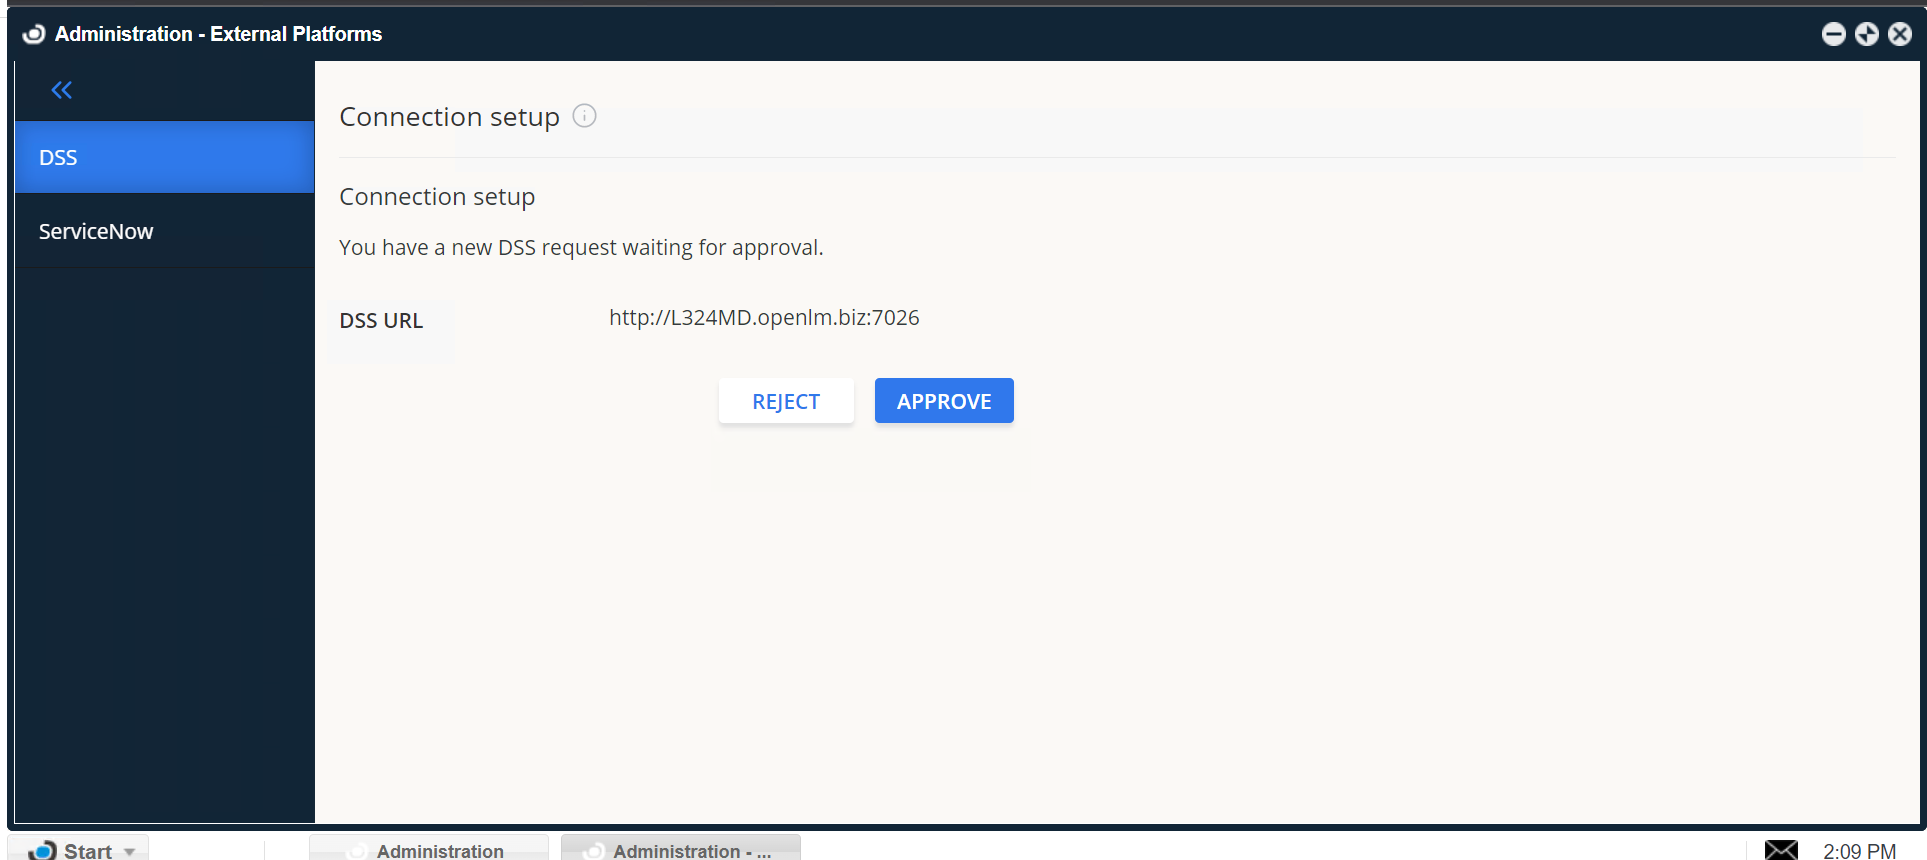
7. Click on the DSS tab on the left then click on Approve.
8. You should see a success message confirming that the connection to DSS has been established successfully:
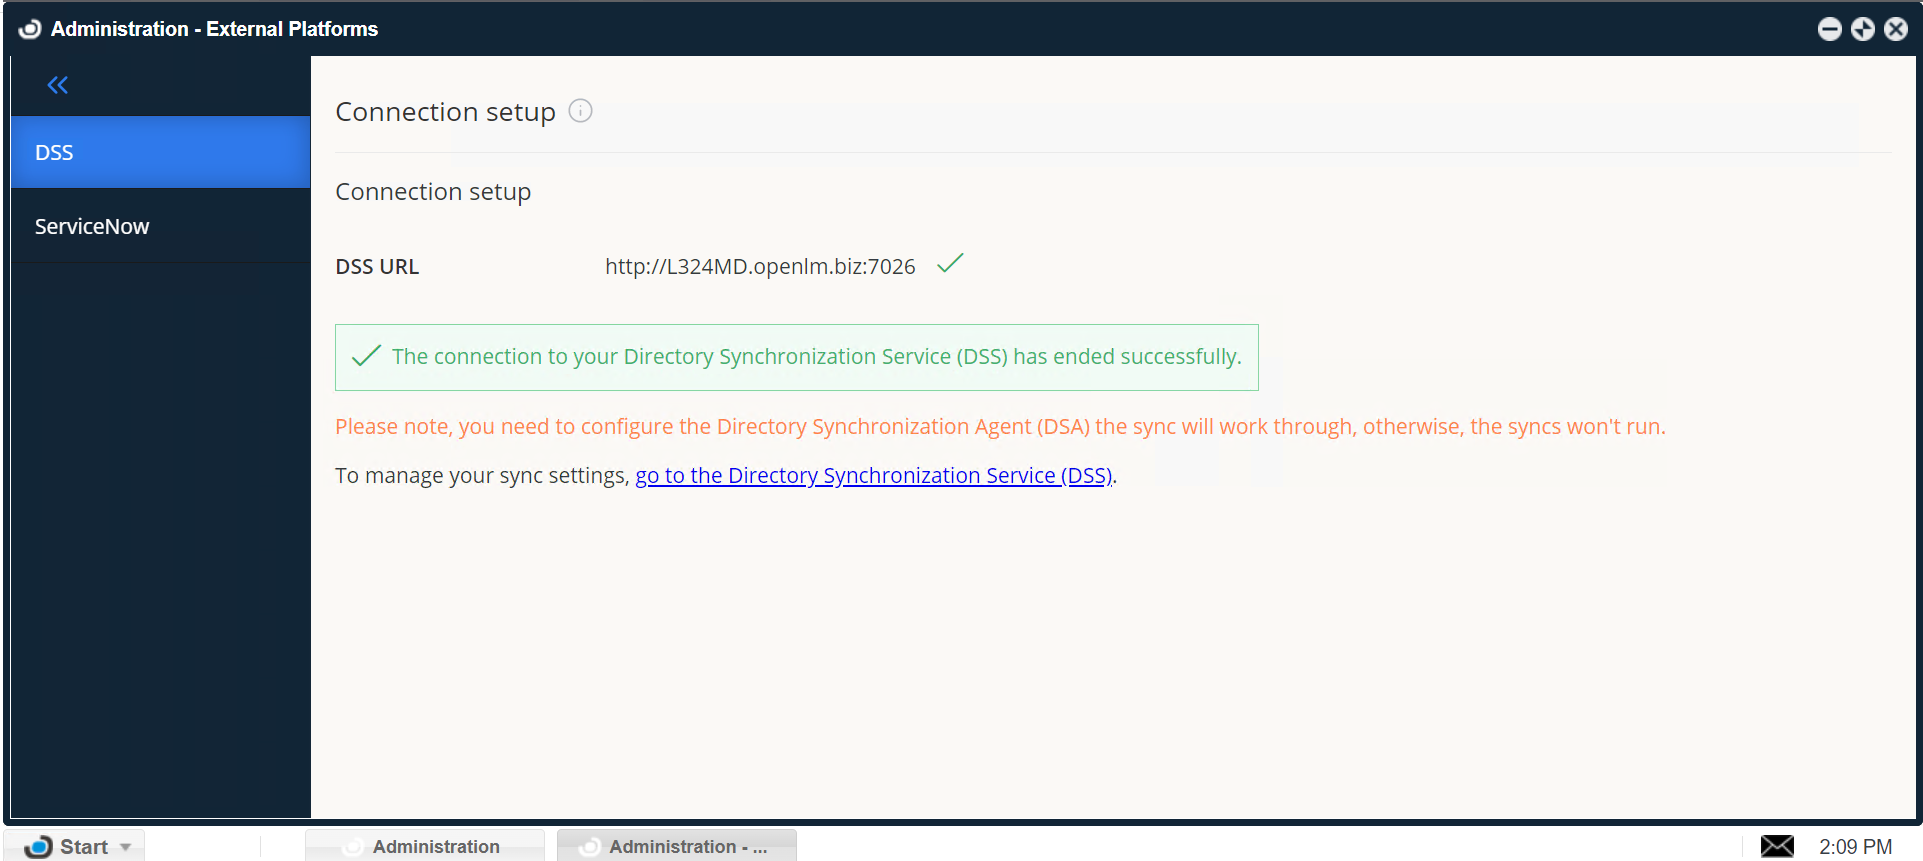
At this point, the connection between OpenLM SLM and DSS is established:
a) If you have any previous LDAP sync definitions, you must decide what to do with them before you can add new domains and configure new sync definitions. Consult section 4.2. below to continue.
b) If you don’t have any previous LDAP sync definitions stored, the configuration is now complete. You will have to add at least one DSA instance before you can start adding domains and sync definitions as described in Section 5.
The workflow of DSS with OpenLM SLM and Identity configured with SSL (HTTPS)
If the OpenLM SLM and Identity are on SSL (HTTPS):
1. After turning on SSL (HTTPS) on OpenLM SLM and Identity Service, open the Connectivity tab of DSS UI and change the Server’s IP/hostname value to HTTPS: FQDN (example “https://hostname.domain”). This should be done because SSL certificates are issued to FQDNs, which is common practice. Click Apply.
2. After DSS is approved in the HTTPS Server, it is mandatory to update the Identity Service location in appsettings.json of DSS by:
-changing manually “Authority” field from “http:identityHost:port” to “https:identityHost:port” or
-from Identity UI Security settings, change the DSS URL by adding “/” at the end of the URL and clicking Save (a workaround to allow Identity to apply new settings and send a request to DSS). For example by changing: http://hostname:7026 to http://hostname:7026/
3. After changes from steps 1 and 2, just restart first DSS, and then DSA services and continue working as usual.
DSS & DSA SSL Configuration
- Turn ON the SSL toggle and provide the certificate path and its password.
- Restart the DSS service.
- Go to the Identity Service UI and provide the new DSS URL (https://FQDN:port).
- Restart DSS service again.
- Open the DSS UI using the new URL https://FQDN:port.
- Set in the DSS UI [DSS SERVER IP/Hostname] field the new URL (https://FQDN).
- Click the Apply button.
Upgrading from Directory Sync 1.4 (Firebird ) to Directory Sync v2x. Database migration during upgrade:
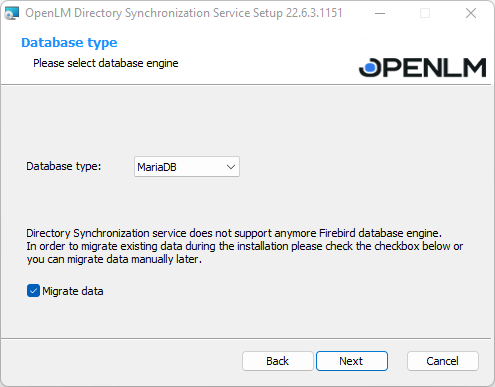
If you are upgrading the Directory Sync, a specially designated checkbox will appear automatically in the DSS migration wizard if the system detects you are using the Firebird engine. If a different database type is used, no migration is required, you’re all set. The guide below also assumes that the migration from OpenLM SLM 5.6 to v 21 has been executed.
- Check the “Migrate data” box. From the dropdown list, choose the desired database then click Next.
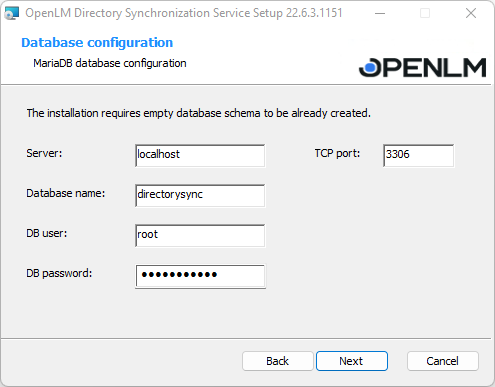
2. The installation requires a clear database schema. You will need to fill in the configuration details as in the screenshot below: Server name, Database name, User, and Password. Click Next.Note: depending on your database type, the fields in the screen below may look slightly different
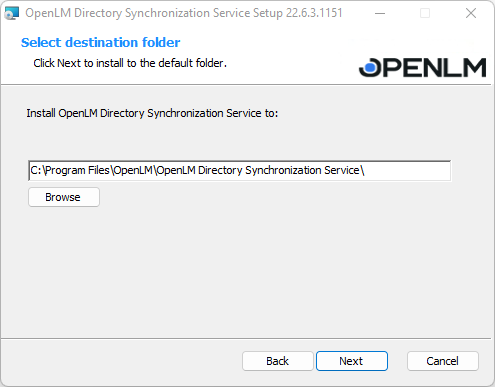
3. Select the folder you want to install the program to. Click Browse to do so or leave the default one (recommended). When the folder has been chosen, click Next.
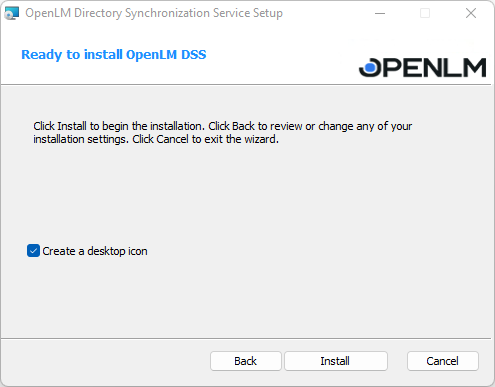
4. The DSS is ready to be installed. Tick the box if you wish to create a desktop icon then click Install.
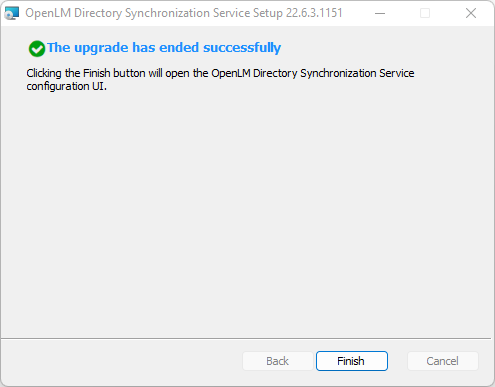
5. The installation/migration has been completed. Click Finish.
6. Open up your DSS page. Go to the Service Configuration tab. Here specify the Server’s configuration details (v21 has a different one than v.5.6) then click Apply.
To check if the changes are successfully applied, open up DSS from Easy Admin. (Administration→Directory Synchronization Service.
7. Continue with the Directory Synchronization Agent upgrade.
DSS Configuration tools
DB Configuration
Note that you must first create a database using the DSS system requirements and upgrade its schema using the “DB Upgrade” procedure below before DSS can use an external database.
Configure which database the DSS will use to store its data.
DSS will be configured to work with an external database: mysql / MySQL/MariaDB (Check the system requirements).
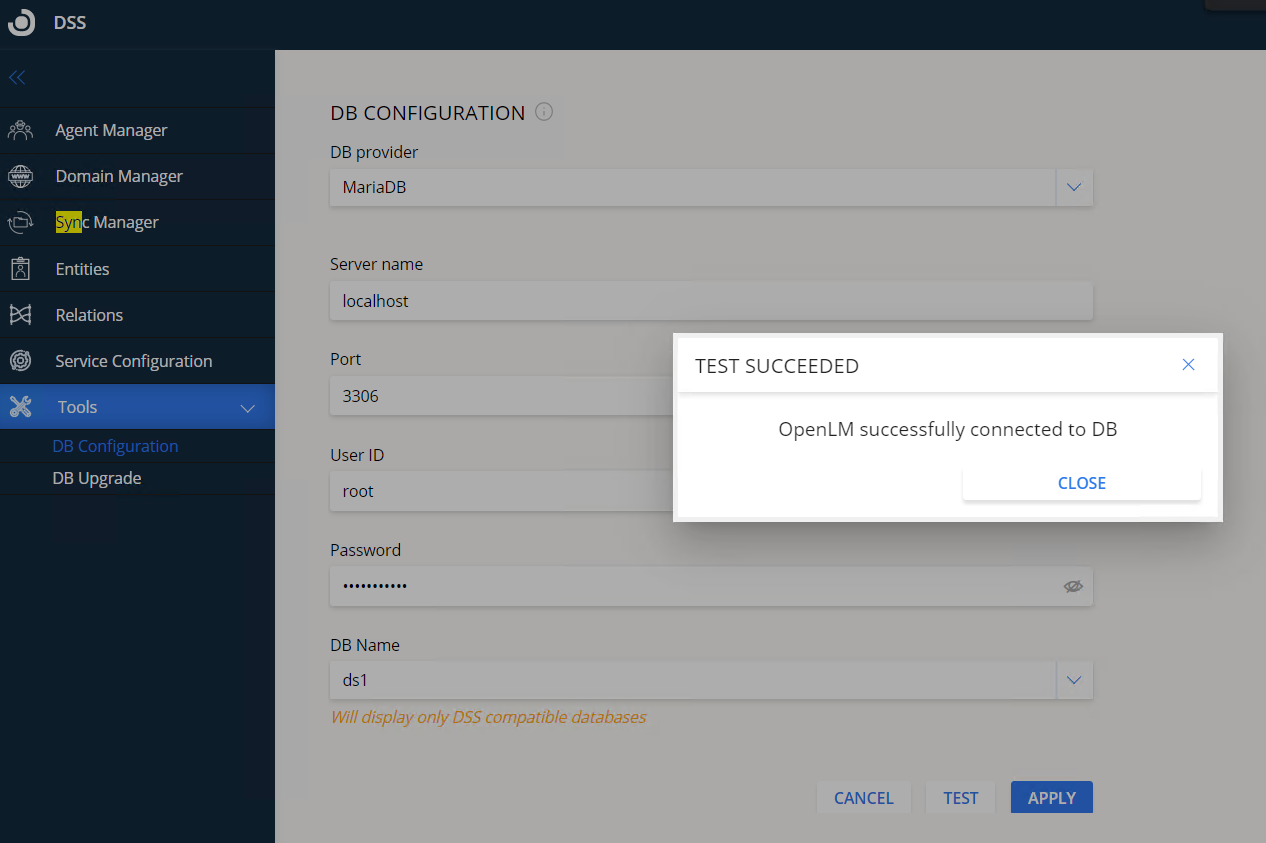
DB provider – select the provider of your database. It can be either MariaDB, MySQL or Microsoft SQL Server with either standard authentication or Windows Authentication.
Server name – the IP or hostname of the external database server.
Port – (MySQL or MariaDB) the database server listening port.
DB Name – the name of the database
User ID – (MySQL, MariaDB or SQL Server Authentication) is the name of the database user.
Password – (MySQL, MariaDB or SQL Server Authentication) is the password for the database user.
Test – click to test the connection to the database.
Apply – save the settings.
DB Upgrade
This tool allows you to upgrade the DSS database to the latest database schema. This operation is necessary if using a newly created database that has not been previously formatted to the DSS schema.
To upgrade the database, select the database type you have, enter the login and connection details on the DB Configuration tab, click Upgrade then follow the wizard instructions.
Usage
Agent Manager
On the Agent Manager tab, you can see all the DSAs controlled by the DSS.
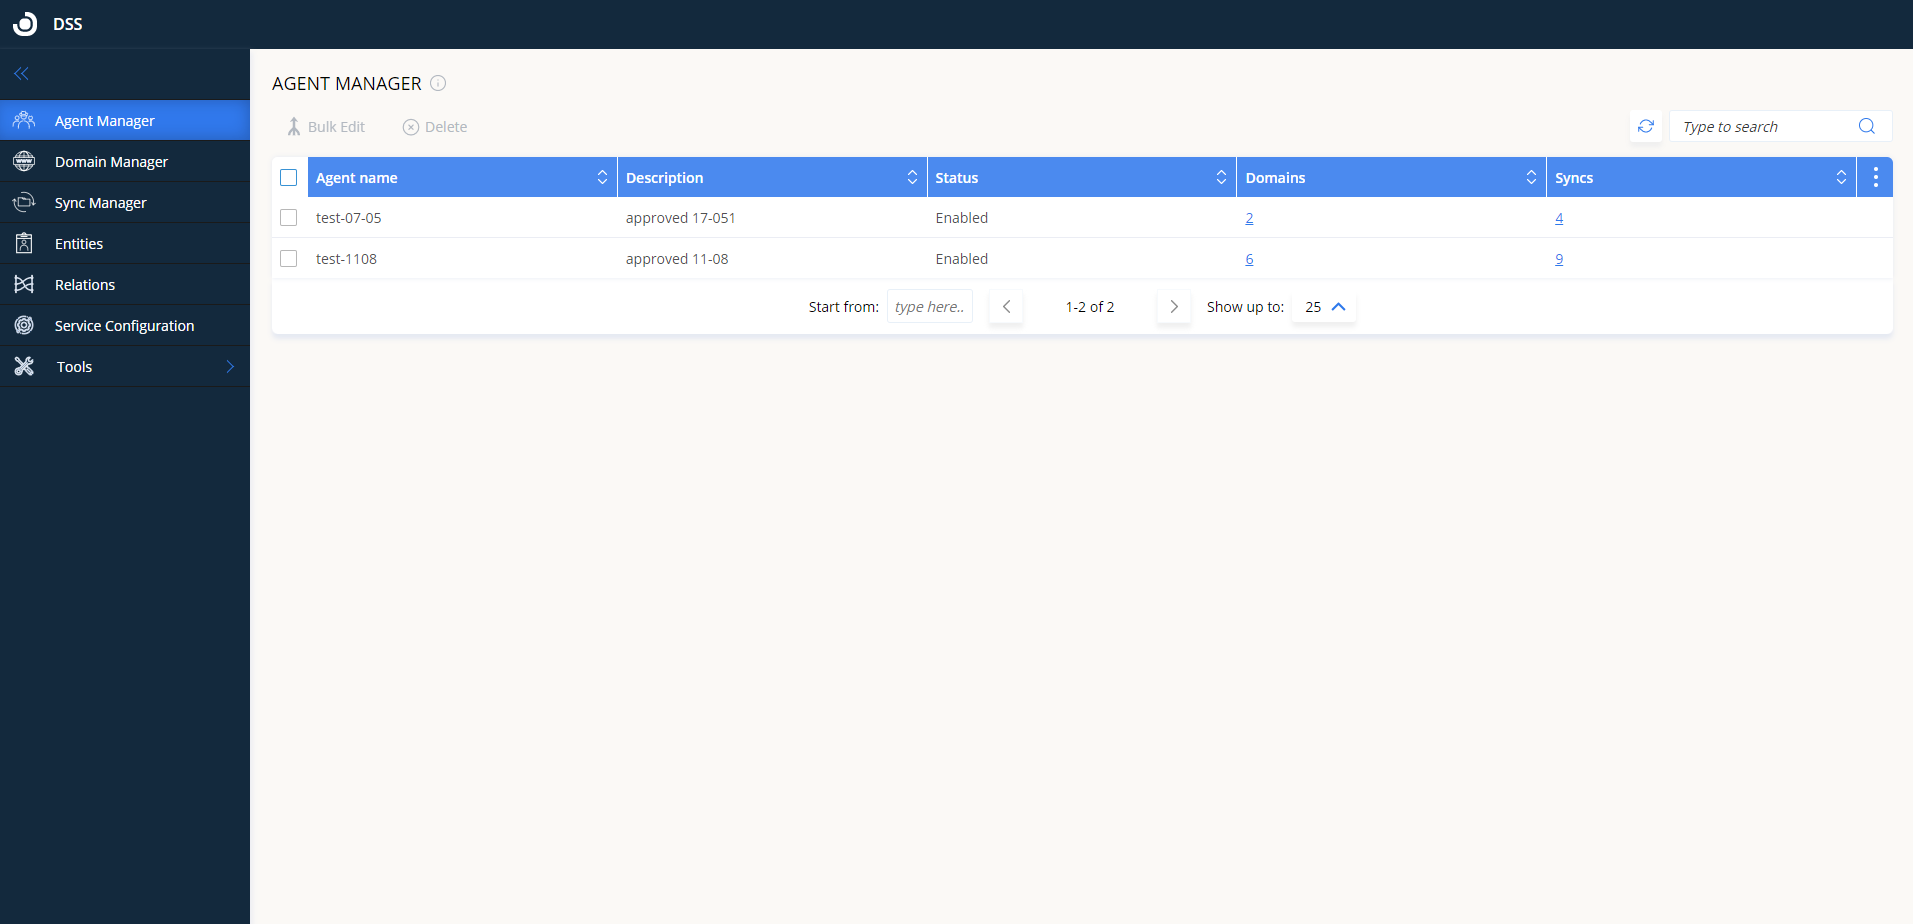
Approve a new agent
All newly installed DSAs configured to report to the DSS have to be approved before they are operational.
To do so:
1. Click the Agent Manager tab.
2. Double-click on the agent row that has its status as “Pending approval” (or click the Edit Agent icon).
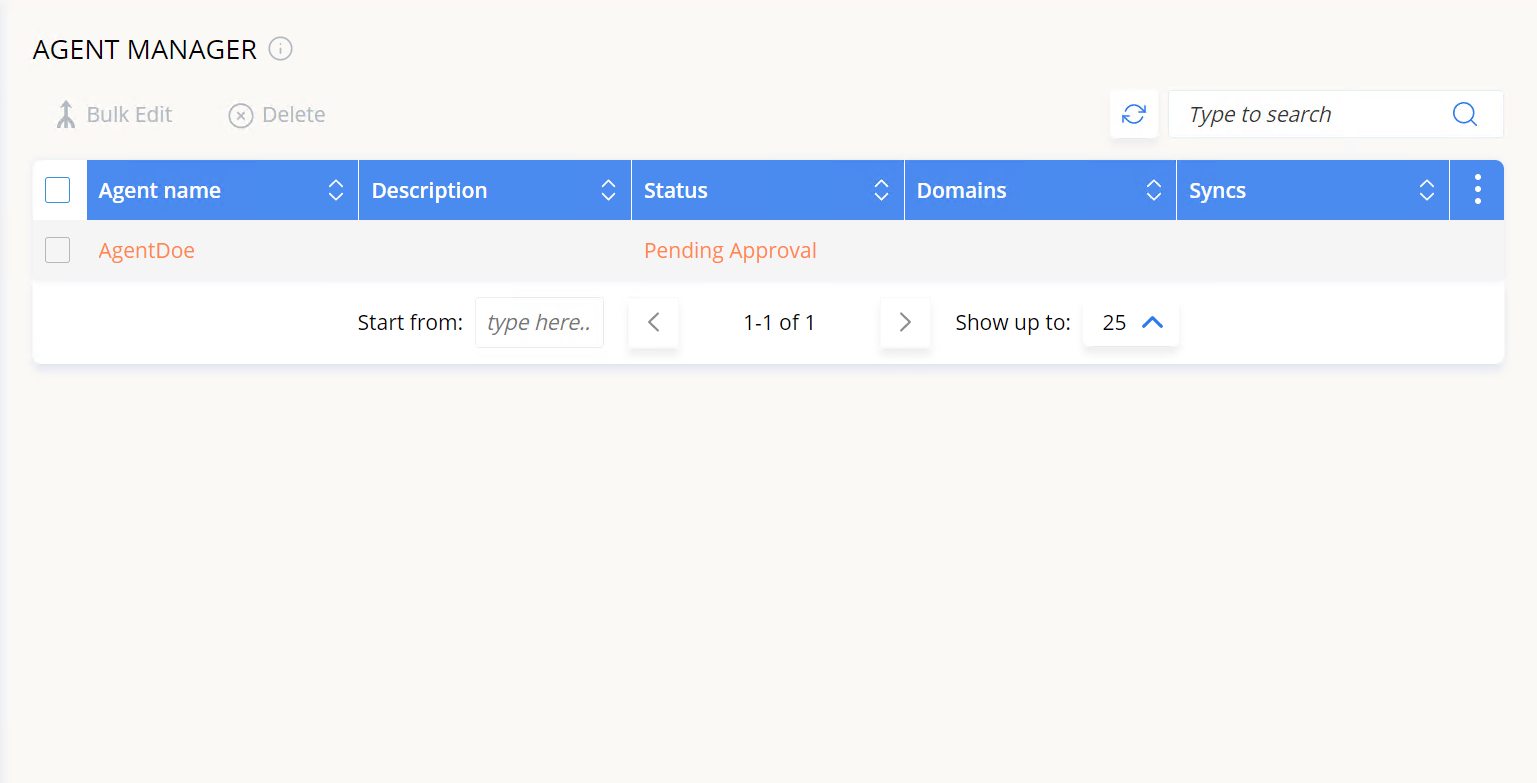
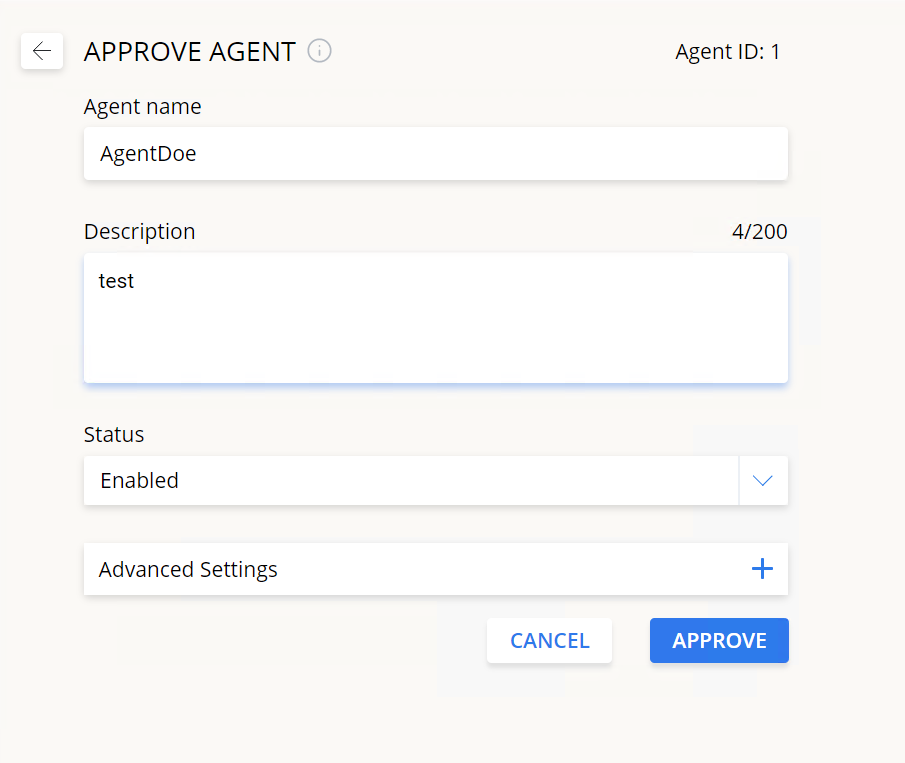
3. On the Approve Agent screen, open the Status drop-down menu and select Enabled then click Approve.
Edit an agent’s properties
1. Double-click on the row of the agent you want to change (or click the Edit Agent icon) and click on Advanced Settings.
2. Change any of the required fields. Consult the text below for the meaning of each value.
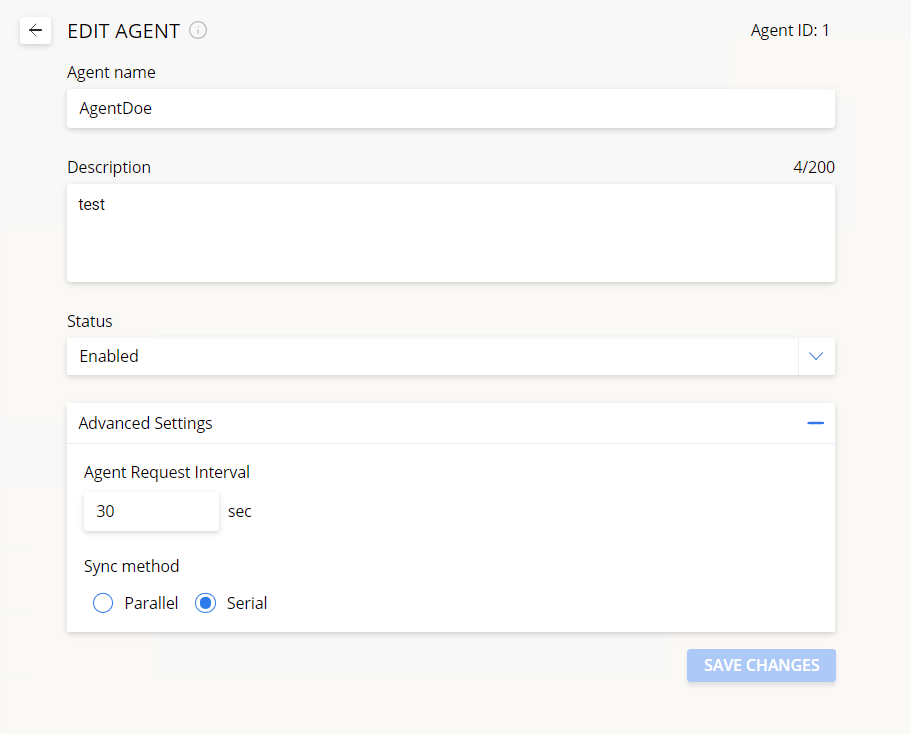
Agent name – a name for the agent. Must be unique (i.e. different from other pre-existing agent names).
Description (optional) – enter any text to help you recall or identify the agent
Status – can be set to either:
- Enabled – the agent is operational, querying the DSS for sync jobs and executing them.
- Suspended – all synchronizations run by this agent will be suspended. Once the status is changed back to Enabled they will resume
Agent request interval – specify how often the agent will query the DSS to check for sync jobs. It can be any value between 5 and 600 (seconds).
Sync method – can be set to either:
- Parallel – this mode means that the agent will run several syncs in parallel, at the same time.
- Serial mode – syncs are run one by one based on the FIFO method (first in, first out).
3. Click Save Changes when done.
Edit agent properties in bulk
To change the properties for several agents at once:
1. Check the box for each agent you want to edit
2. Click on Bulk Edit.
This will open the Bulk Editor window.
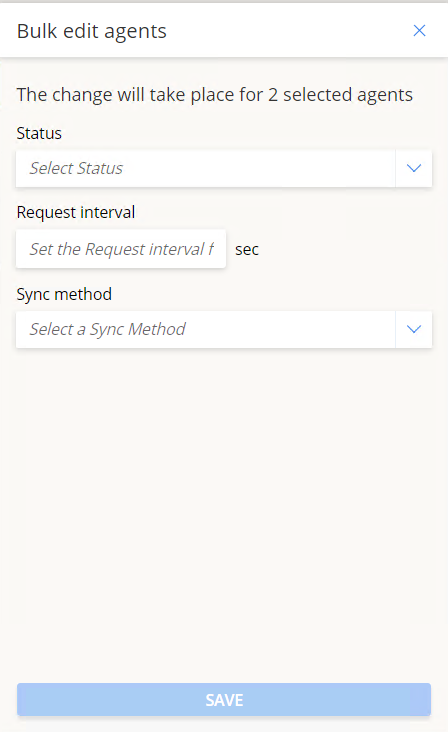
The available properties are the same as described in section 6.1.2. above.
3. Once done, click Save to apply the changes.
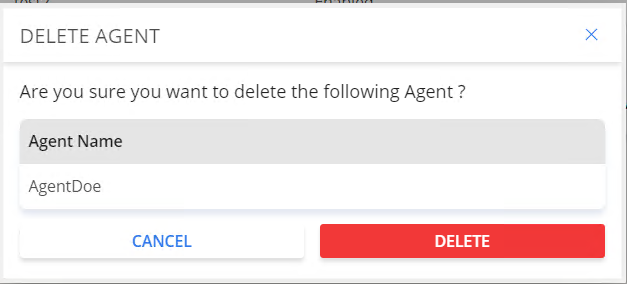
Delete an agent
To delete one or more agents, check the box of the agent you wish to delete then click Delete.
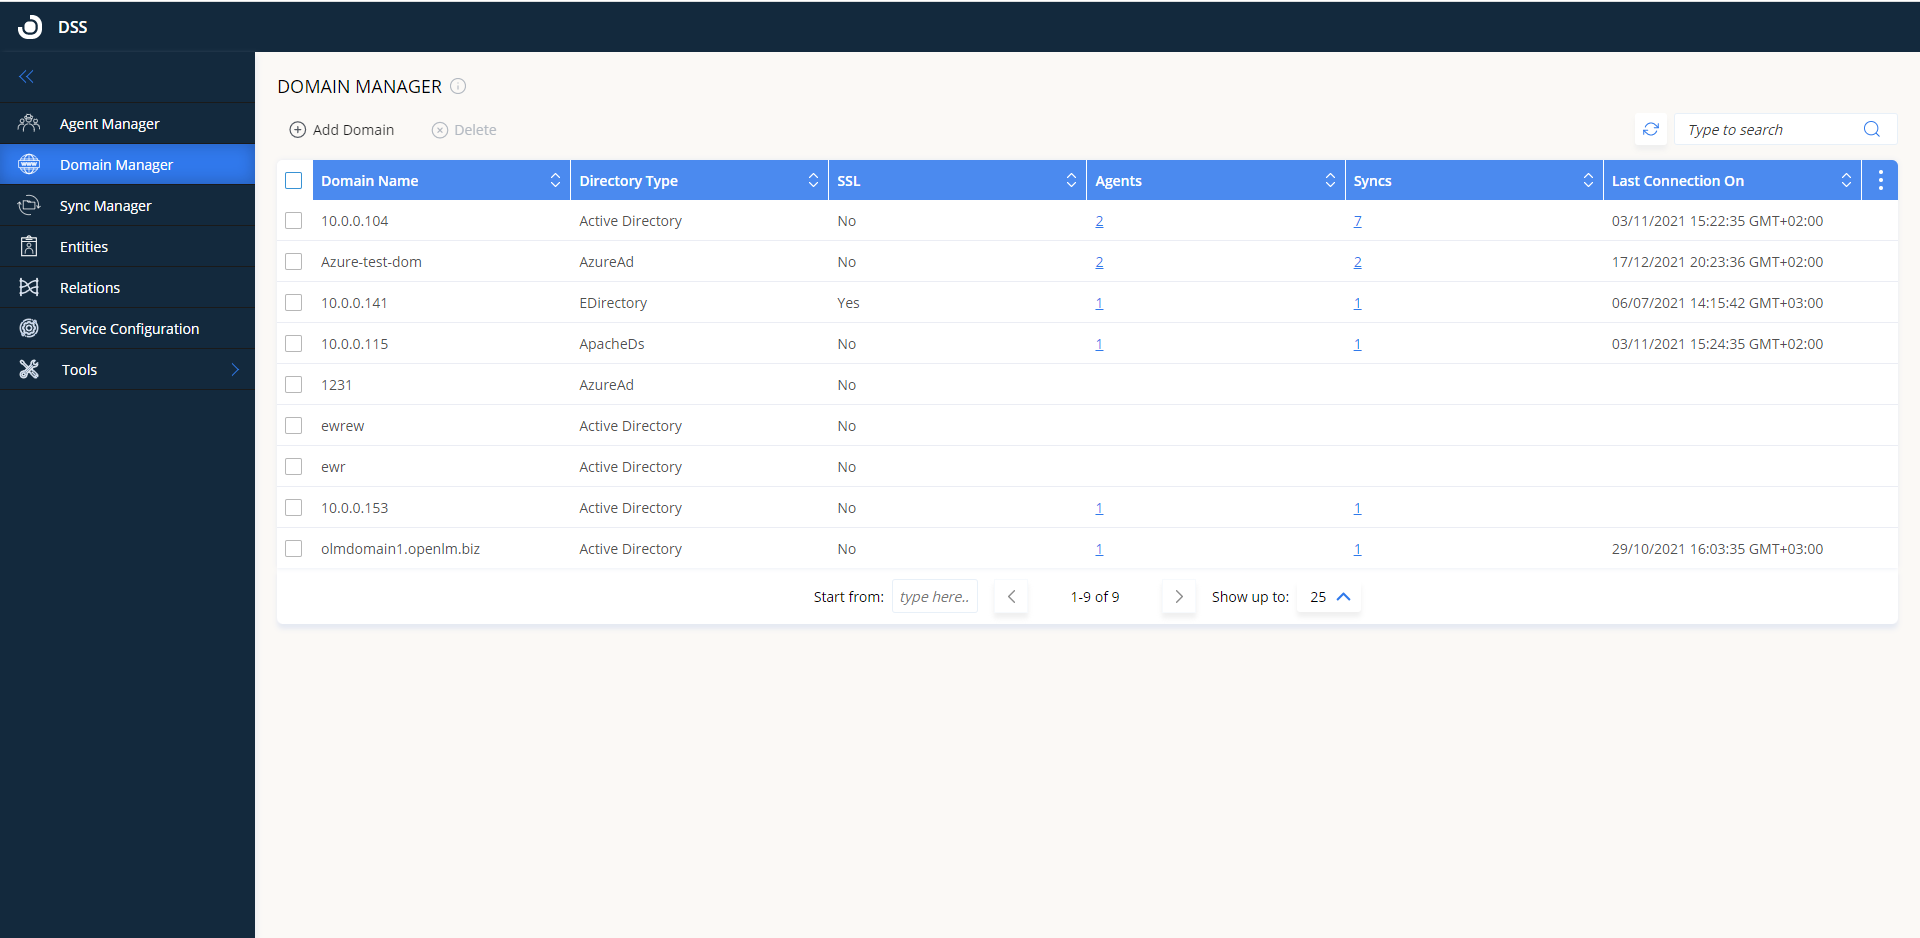
Domain Manager
On the Domain Manager tab, you can configure the domain directories you would like OpenLM to sync with.
Add a new sync domain
1. Click on Add Domain. The Add Domain screen will open. Configure the fields according to the instructions below.
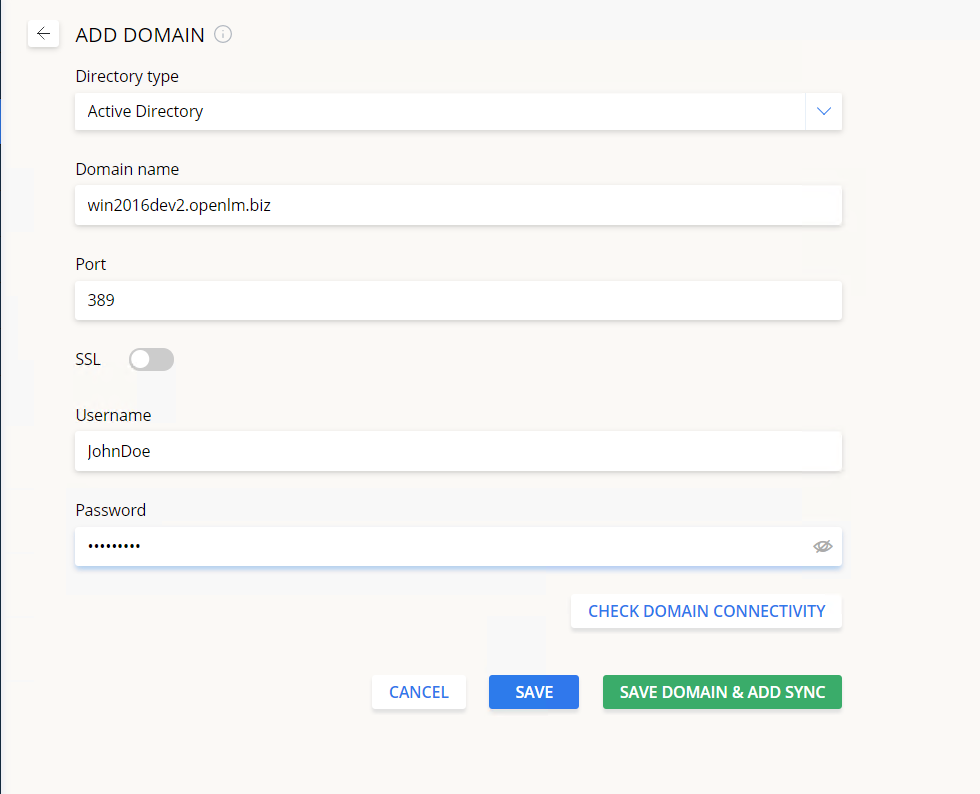
Domain type – the type of the LDAP domain directory that you want to synchronize with. Currently, you can select either of these:
- Active Directory
- eDirectory
- ApacheDS
- AzureAD
- Google CDS
Domain name – the hostname/IP of the domain controller
Port – the port of the domain controller
SSL – toggle if the connection to the domain controller is SSL encrypted
Username – the username of an administrator account. Note that read access is required. A service account is recommended. If a normal account is used, the password might expire at which point the sync would stop working
Password – the password of the domain controller user
For Azure:
- Domain Name
- Client ID
- Client Secret
- Tenant ID
For more details about AzureAd synchronization consult this link.
For more details about Google CDS consult this link.
For more details about Okta integration consult this link.
2. Click on Check Domain Connectivity to run a test. You will be prompted to select an agent which will run the connectivity test. The operation itself can take up to 2 minutes. Once finished, you will see either a success or failure message below the button.
3. Click either on Save to save the domain configuration OR click on Save Domain & Add Sync to save the configuration and open the Add Sync screen with this domain already preselected.
Delete a domain
To delete one or more domains, check the box of the domain you wish to delete then click on Delete.
You will see a final warning popup:
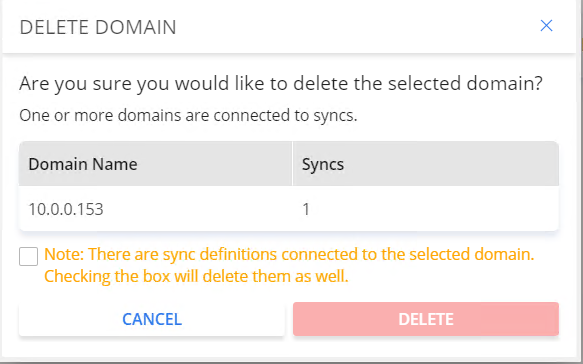
Note: if there are any sync definitions associated with a domain, the sync definitions will also have to be deleted. Checking this box is required to proceed.
Sync Manager
On the Sync Manager tab you can configure the synchronization definitions for the domains OpenLM will sync with. The Sync Manager centralizes access to all sync configurations.
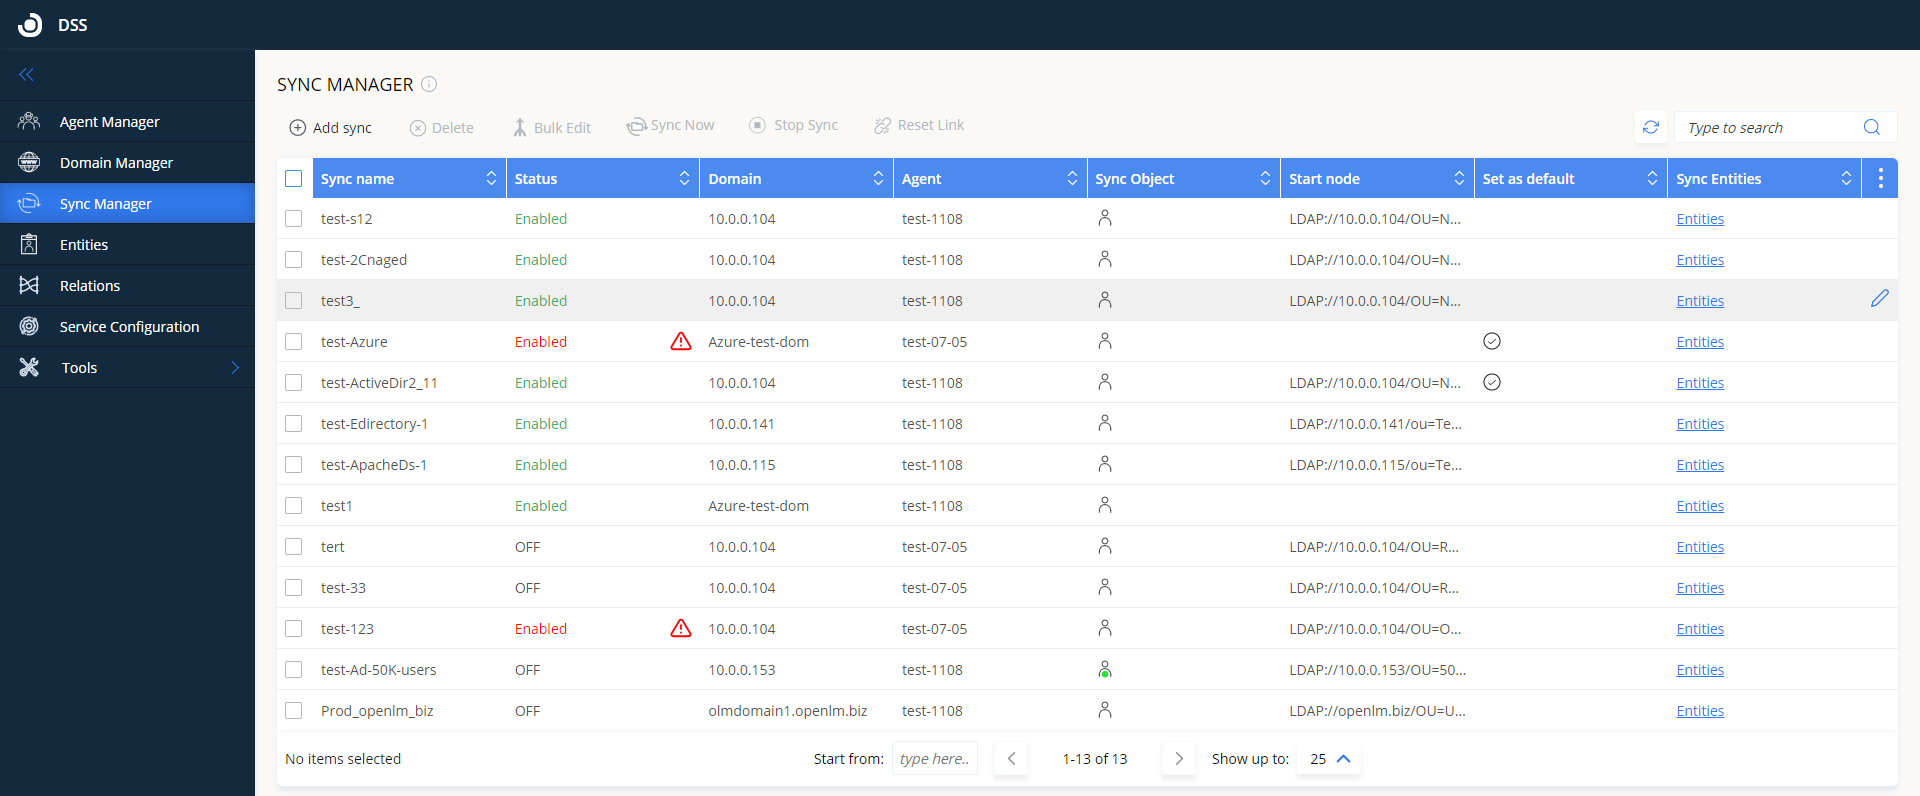
Add a new sync definition
To add a new sync definition:
1. Click Add Sync.
2. Fill in the fields as follows:
Sync name – enter any text to identify the sync definition. Must be unique (i.e. different) from other sync definition names.
Status – toggle whether this sync is enabled or disabled.
Destination & Time tab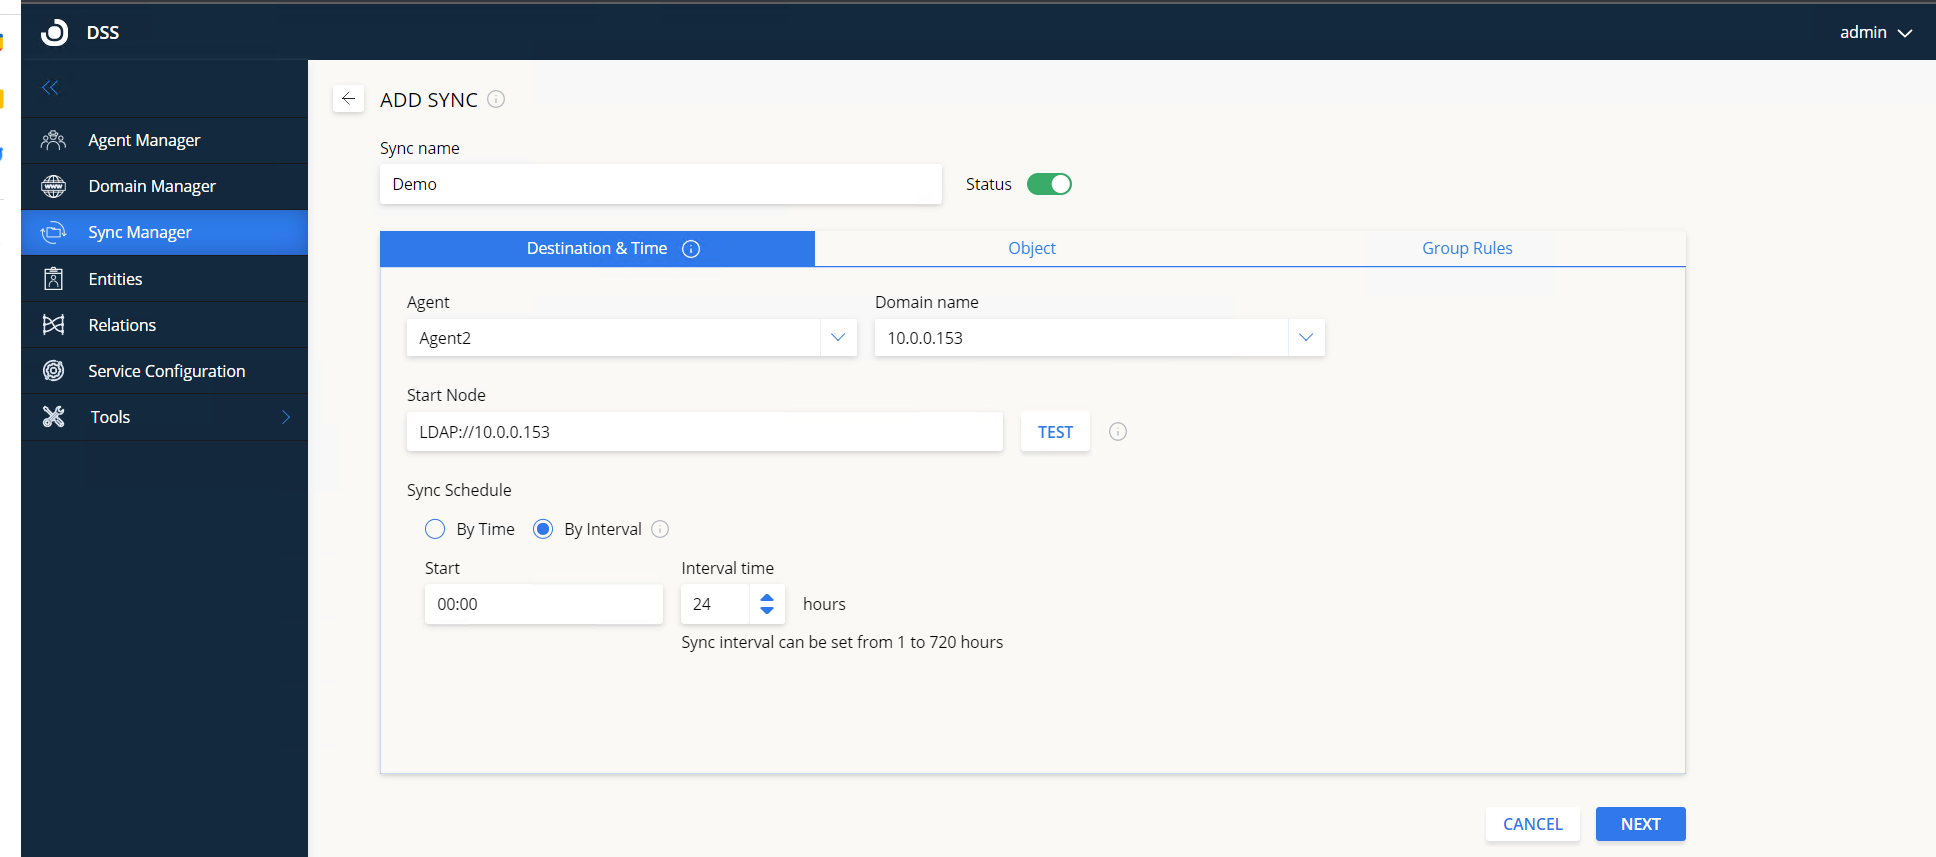
Agent – select the agent that will execute this sync.
Domain name – select the domain to be synced. The drop-down list will be auto-populated with domains from the Domain Manager tab.
Start node – enter the LDAP path for the node that this sync will start from. For large service directories, specifying a node in the tree narrows the search and improves performance. By default, this value is automatically filled to correspond to the root of the selected domain directory. Click Test to validate the directory start node (can take up to 2 minutes). Make sure the LDAP connection string is in the right format.
Example #1: select the organizational unit “OU_AB” for the “testdev1domain.openlm.biz” domain on domain controller 10.0.0.153
LDAP://10.0.0.153/OU=OU_AB,DC=testdev1domain,DC=openlm,DC=biz
Example #2: Select the “SecGroup” security group for the “openlm.com” domain on domain controller server2008r2ldap.openlm.biz
LDAP://server2008r2ldap.openlm.biz/CN=SecGroup,DC=openlm,DC=com
Example #3: Select the group “Group_AB1” under organizational unit “OU_A” which in turn is under organizational unit “OU_AB” for the “testdev1domain.openlm.biz” domain
LDAP://10.0.0.153/CN=Group_A2,OU=OU_A,OU=OU_AB,DC=testdev1domain,DC=openlm,DC=biz
For help with finding the correct node path, a tool like LDAP Admin can be used: right-click on a node tree and select “Copy dn to clipboard”.
Sync schedule – define the schedule for when the sync will be run:
- By time – select a day and a start time for the sync then click Add to add it to the schedule. Multiple times can be added.
- By interval – enter a start time (format hh: mm) and the interval at which the sync will be repeated (can be any value from 1 to 720 hours). If the DSS is restarted, it will wait for the start time to trigger the sync.
Object tab

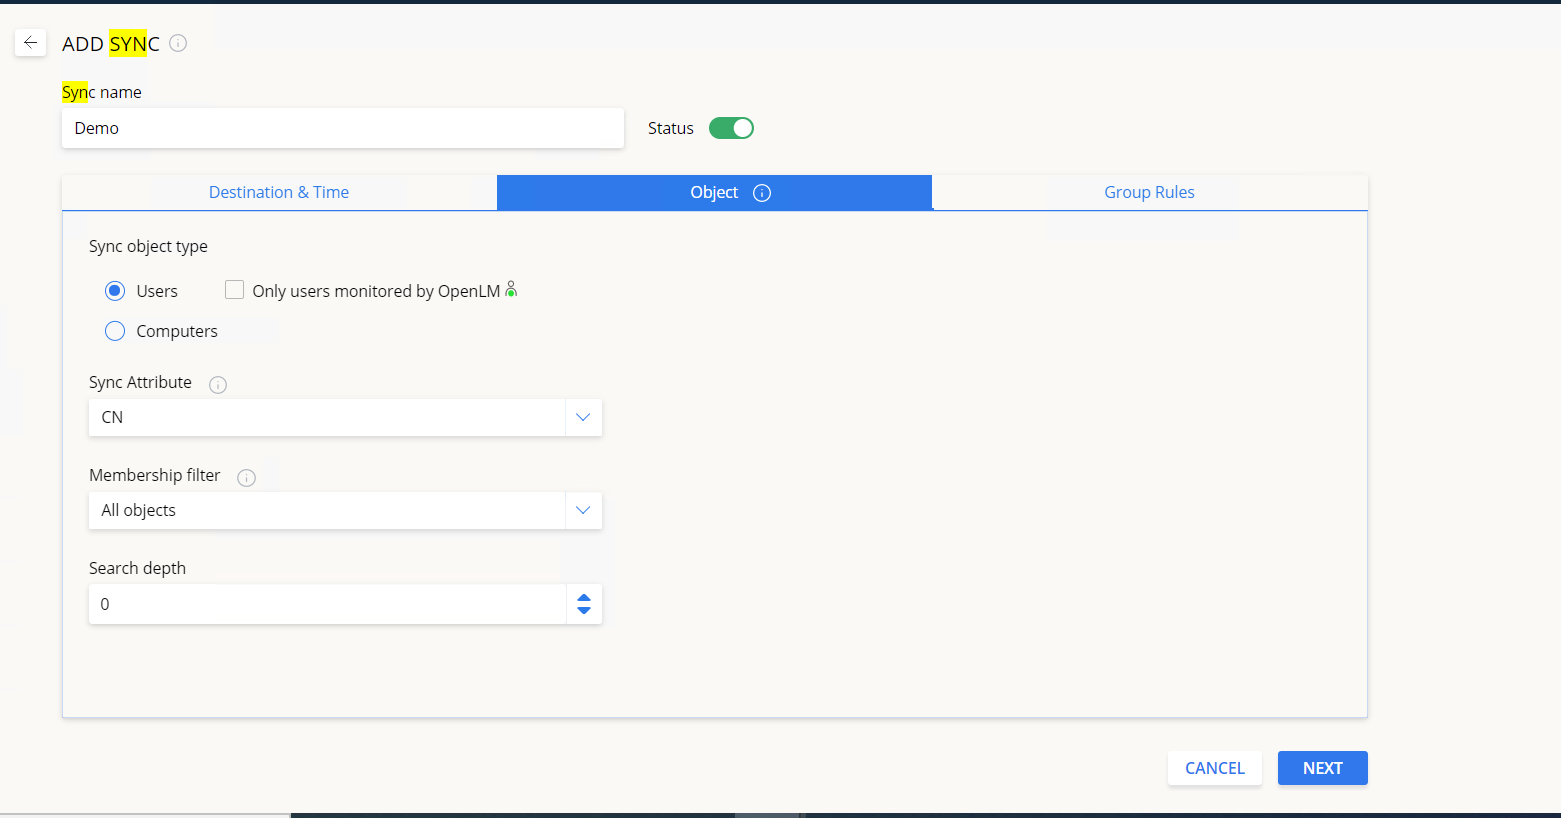
Sync object type – select the object type to be synchronized:
- Users – only user objects will be synchronized. Here you can check the Only users monitored by the OpenLM box (description below).
- Computers – only computer objects will be synchronized.
Note: for Azure AD – only the Users option is supported
Only users monitored by OpenLM
Checking this box means that when the sync is run, only the records of directory users with a matching OpenLM username will be imported and synchronized. This option is useful if you want to avoid adding directory users that have no correlated license activity recorded in the OpenLM system.
Technical note: for performance reasons, the monitored user list is cached by DSS. When a scheduled sync is triggered, DSS evaluates how much time has passed since the list was last retrieved from the Server (provided this isn’t the first time a sync is run). If this period is greater than the ActiveUsersRefreshIntervalHours parameter in the appsettings.json file, DSS will first query OpenLM SLM to update the user list and then proceed to query the directory via DSA using this updated list. If the period is lower than the set parameter, DSA will query the directory using the user list from the cache. Manual syncs bypass this condition. Set this parameter to a lower amount if you need to trigger syncs more frequently and anticipate that monitored OpenLM users will be added/changed during the sync interval.
Sync attribute – Select or enter the directory attribute for synchronizing the username. Make sure that the attribute exists for your specific directory type. The “Sync attribute” is supported only for the “Users” object type. Select from:
- All Attributes
- Custom Attributes:
cn is the standard “Common Name” attribute used by all LDAP directories.
sAMAccountName (e.g. “jdoe”) is used by Windows Server pre-2000 Active Directory versions.
userPrincipalName (e.g. “john.doe@company.com”) is used by Windows Server post-2000 Active Directory versions.
mail
givenName
sn
dispalyName
telephoneNumber
title
department
description
physicaldeliveryofficename
whenCreated
whenChanged
ou
mobile
co
c
countryName
id
jobtitle
mailnickname
surname
MobilePhone
Note: when selecting the “Custom selection of attributes” option. only selected attributes will be retrieved from LDAP and sent to an external third-party system (OpenLM SLM or Users and
Groups service).
In case DSS is still working with the OpenLM SLM, the last one has the logic to clear all user’s properties (except (Mobile Phone].
[Email] and (Country|) before updating from LDAP sync, so if you disable some non-mandatory attributes in DSS sync settings, they will be empty after sync (except [Mobile Phone]. [Email] and [Country] – they will remain unchanged)
Note: for Azure AD – only the UserPrincipalName option is supported
Membership filter – Choose whether to sync all objects (no filter) or only objects that belong to either Organizational Units (OUs) or Security Groups.
Note: for Azure AD – there are two options
- All objects
- Only members of a group
Search depth – define the sync depth. This option allows limiting the synchronization process to a certain hierarchical level:
- 0 (default) – the full tree group hierarchy will be synchronized.
- 1 – only the start node group will be synchronized.
- 2 – the start node group and its 1st level descendants will be synchronized.
- 3 – the start node and its 2nd level descendants will be synchronized.
- And so on.
Group Rules tab
Select the rule by which groups will be created:
No groups – This is the default selection for group synchronization. This option negates any groups that an object belongs to. All objects will be assigned to the system default OpenLM_Everyone group.
Flat – All objects will become members of the group defined by the administrator. All objects found in the specified sync tree will be assigned as members of this single group. Any other hierarchical structures will be ignored.
Hierarchical – Create groups according to the hierarchical LDAP node trees. You can choose which kind of object classes to include in this rule:
- Organizational Units (OUs) – any existing OUs in the directory will have groups created with the same name and the objects belonging inside them will be assigned as members of these groups.
- Security Groups – any existing Security Groups in the directory will have groups created with the same name and the objects inside them will be assigned as members of these groups.
- Distribution groups – any existing distribution groups in the directory will have groups created with the same name and the objects inside them will be assigned as members of these groups.
- Customized & Unknown Object Classes – any unknown and custom object classes (those outside the standard directory class types of OUs, Security Groups, and DGs) – will have groups created with the same name and the objects inside them will be assigned as members of these groups.
Note: for Azure AD – only the Security Groups option is supported
Include start node – whether to include or not the start node in the synchronization.
Search depth – define the sync depth. This option allows limiting the synchronization process to a certain hierarchical level:
- 0 (default) – the full tree group hierarchy will be synchronized.
- 1 – only the start node group will be synchronized.
- 2 – the start node group and its 1st level descendants will be synchronized.
- 3 – the start node and its 2nd level descendants will be synchronized.
- And so on.
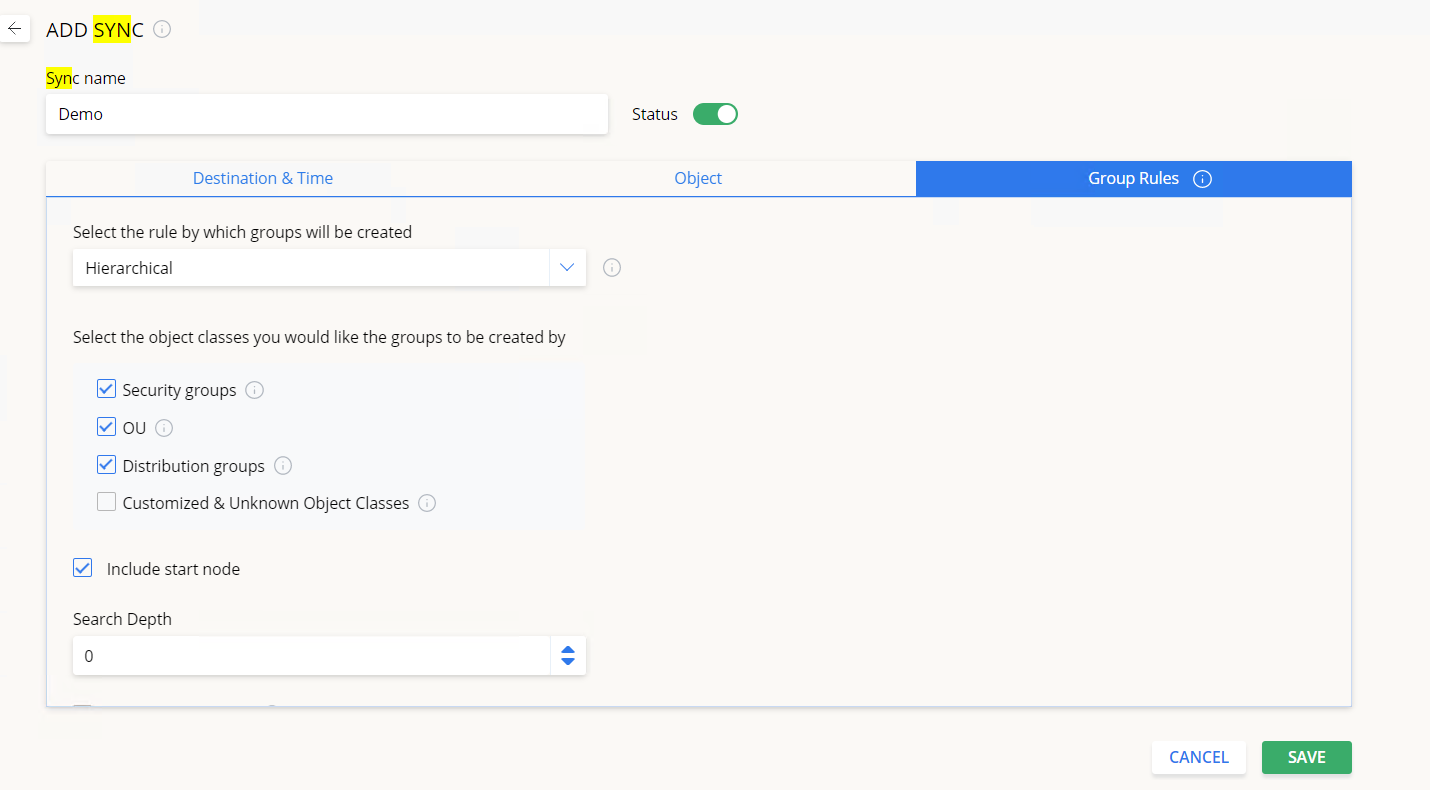
Entity attribute – Groups will be created according to the specific attribute a member has. Type or select an attribute from the drop-down menu that you would like to synchronize by (e.g. “Division”, “Employee ID”, “Initials”, “Department”, etc.). For each unique attribute, a new OpenLM group is created. If a user/computer is found to have the same attribute, it is added to the respective group.
Regular expression to specify the sub-level of the selected attribute (optional) – allows synchronization by an attribute that matches the Regex expression. E.g. If the “Country” attribute is selected, entering “USA” means that only objects that have their “Country” attribute set to “USA” will be synchronized.
Set as default group checkbox
For reporting purposes, the default group is considered the group towards which a user’s license usage time is counted. By default, all users created manually or synchronized into OpenLM are assigned to the system default OpenLM_Everyone group. Checking this box allows you to override this behaviour:
- For the Flat and Entity Attribute synchronization rules, the default group will be the one you input or select from the menu.
- For the Hierarchical synchronization rule, the default group will be the first one that is found during the scan (e.g. if JohnDoe belongs to groups A, B and C – the default group is A)
While “Set as default group” is checked, the default group of an object is set and overwritten each time the synchronization runs.
Note about ApacheDS:
Because of some specific ApacheDs rules in the group’s implementation, DSS is synchronizing ApacheDs groups in a different way from other directory types. The group in ApacheDs is usually specified as objectClass = groupOfNames OR groupOfUniqueNames. Respectively, child objects (members) in such cases are members or uniqueMember. Based on these relations is defined group membership. So, groupOfNames should contain member(s), and groupOfUniqueNames should contain uniqueMember(s). See the example below:

Link to the mapping details here.
6.3.2. Manually trigger a synchronization
Clicking the

icon with one or more sync definitions selected will manually trigger the respective synchronizations to be run.
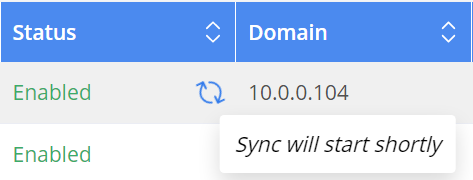
Once triggered, you should see an animated icon indicating progress. Hovering over the icon will display the current status of the synchronization.
Reset entity-relationship data
Clicking the

icon with one or more sync definitions selected will clear all relationship data that was generated by that sync definition, including any “ignore” flags (see 6.4.1) that might have been previously set. It does not affect actual user data.
Stop Sync button
Sometimes syncs get stuck on the “Update Openlm DB” phase. Use the “Stop Sync” button to cancel those syncs to be able to run them again.
Delete a sync definition
To delete one or more sync definitions, check the box of the definition you wish to delete then click on Delete.
You will see a final warning pop-up before it is deleted.
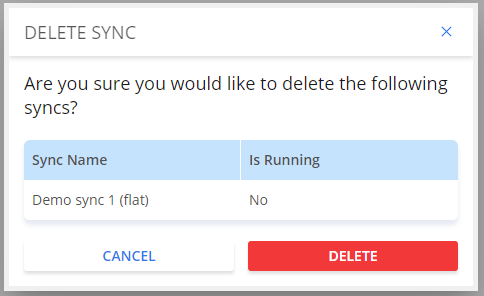
Note that if a sync is running, it cannot be deleted.
Entities
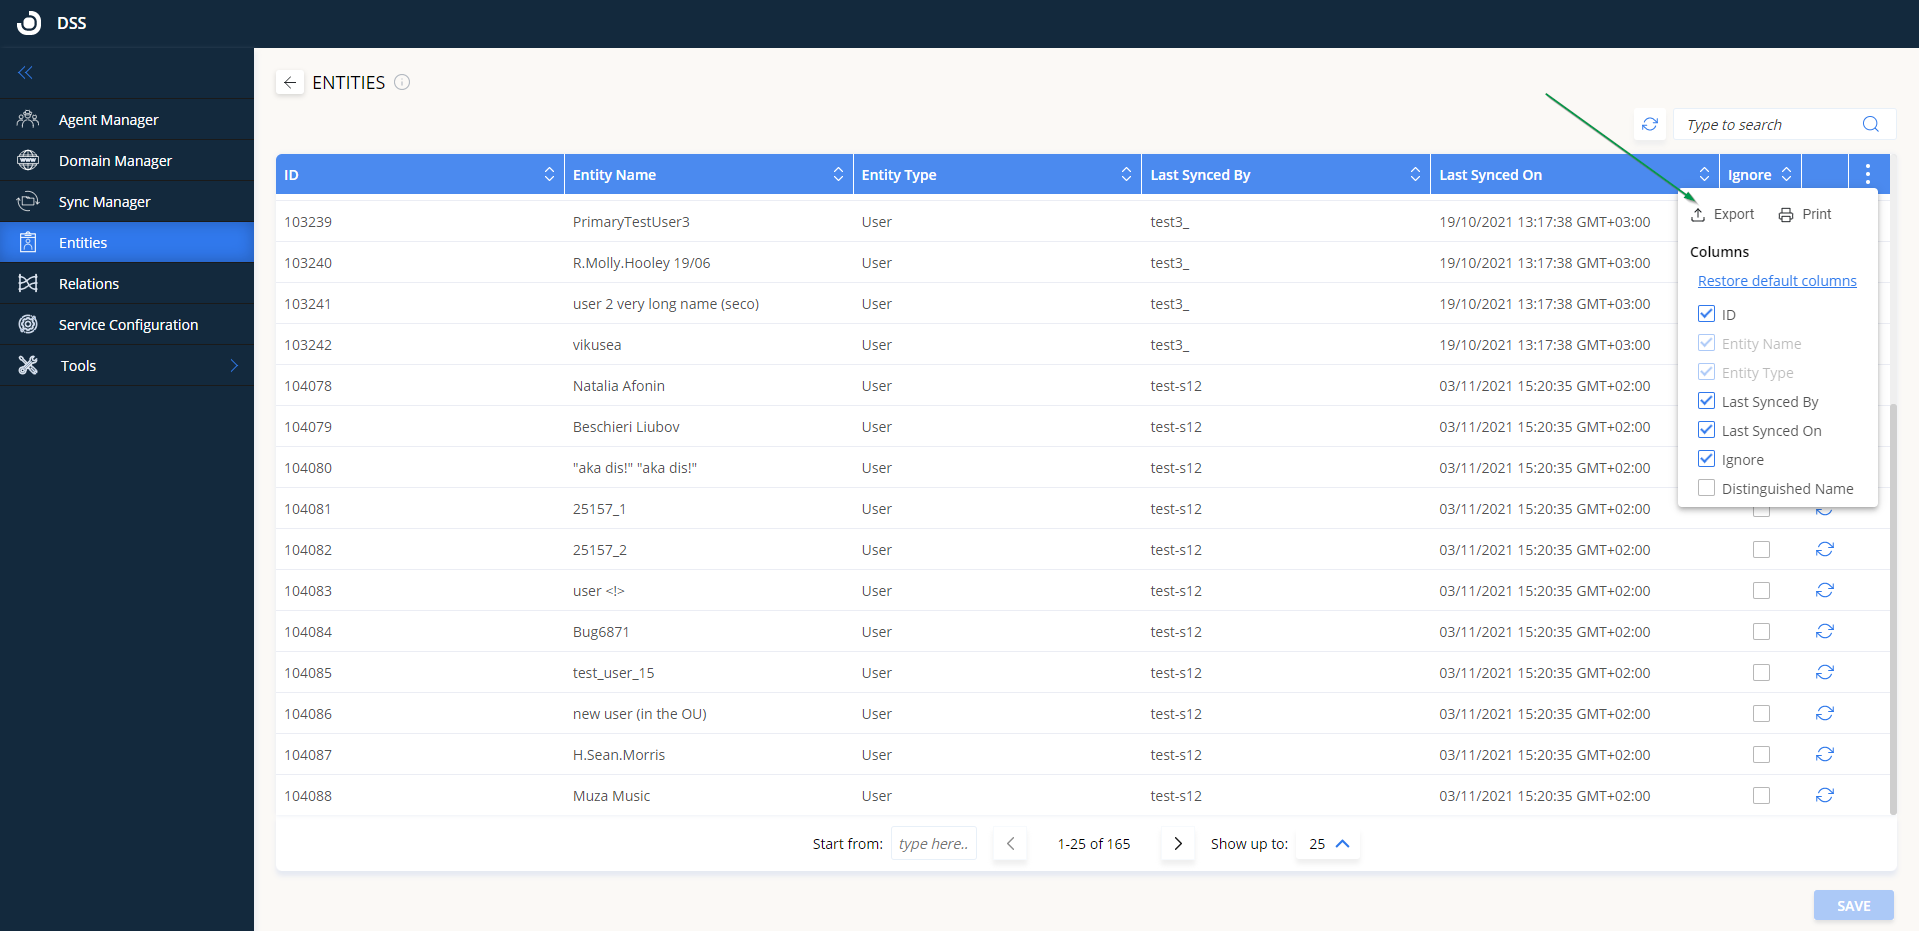
On the Entities tab, you can see the entities created by the DSS synchronizations and set individual to ignore flags. The columns show the ID an entity has in the DSS database, the entity name, the entity type, which definition last synced it, and when was the last time it was synced. Use the filters to see which entities were modified by which sync, or search for a specific entity. Also, there is the possibility to customize the list of columns, print or export the table and configure the number of entities displayed on one page:

Ignore an entity from all synchronizations
Checking the Ignore box for a specific entity and then clicking Save will ignore that entity from all synchronization definitions. Any updates that might occur in the directory records will not be reflected in the OpenLM database for that entity.
Manually synchronize an entity
Clicking the

the icon will manually trigger synchronization for that specific entity. This option overrides any “ignore” flags that might have been previously set.
View entity relationships
Clicking on the

icon for a specific entity will open the Relations tab and display the relations that a specific entity has.
Relations
On the Relations tab, you can see all the relations an entity has in the DSS database, including the agent that queried the directory for this entity, the domain to which the entity belongs, the sync definition it is associated, the entity name, its parent name (if any) and the last time it was synced on. Use the filters to see which relations were updated and when.
The “Ignore” checkbox is per entity for the sync it is associated with. The list of columns can be customized and the table can be printed or exported. Also, the number of relations displayed on the page can be configured:

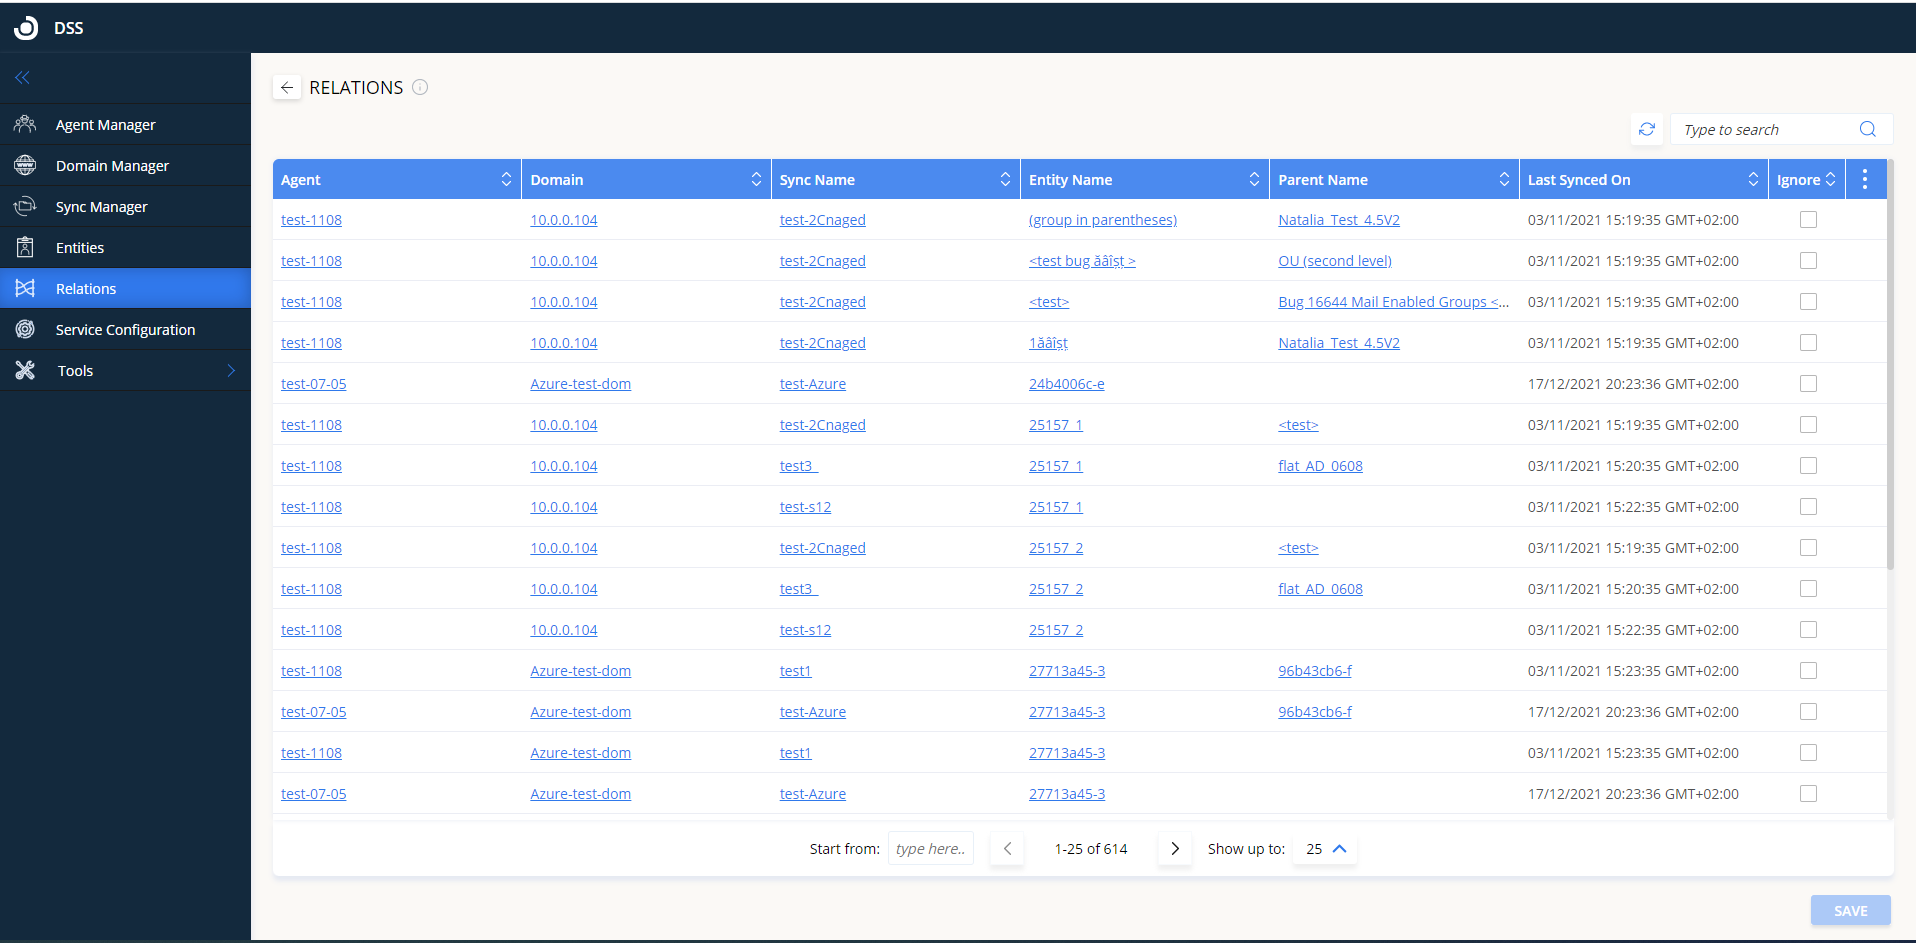
Clicking on any of the links will switch to the appropriate tab, showing more information about the linked item (agent, domain, sync, or entity).
Ignore an entity from a specific synchronization
Checking the Ignore box for a specific Relation entity and then clicking Save will ignore that entity from the synchronization it is associated with under “Sync Name”. Any updates that might occur in the directory records will not be reflected in the OpenLM database for that entity, for this specific sync definition.

